mail_outline sales@mediastorehouse.com
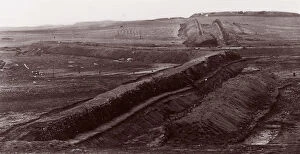
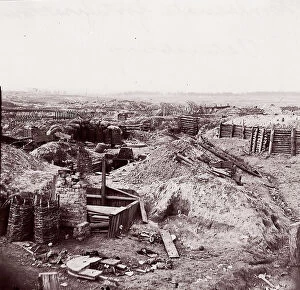
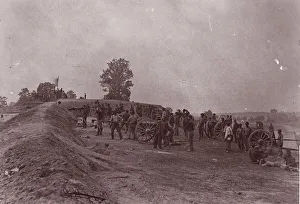
Confederate Earthworks, Centreville, Virginia, 1862. Creator: George N. BarnardConfederate Earthworks, Centreville, Virginia, 1862
Rebel Works in Front of Atlanta, Georgia No. 2, 1860s. Creator: George N. BarnardRebel Works in Front of Atlanta, Georgia No. 2, 1860s
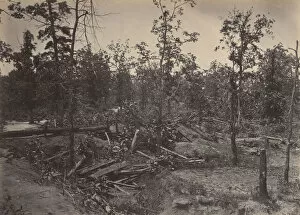
Battle Field of Atlanta, Georgia, July 22nd 1864 No. 1, 1860s. Creator: George N. BarnardBattle Field of Atlanta, Georgia, July 22nd 1864 No. 1, 1860s
Entrenchments on left of Bermuda Hundred Lines, 1861-65. Creator: Andrew Joseph RussellEntrenchments on left of Bermuda Hundred Lines, 1861-65. Formerly attributed to Mathew B. Brady
Extreme Left of Bermuda Hundred Lines, 1861-65. Creator: Andrew Joseph RussellExtreme Left of Bermuda Hundred Lines, 1861-65. Formerly attributed to Mathew B. Brady
Confederate Fortifications, Petersburg, 1864. Creators: Tim O SullivanConfederate Fortifications, Petersburg, 1864. Formerly attributed to Mathew B. Brady
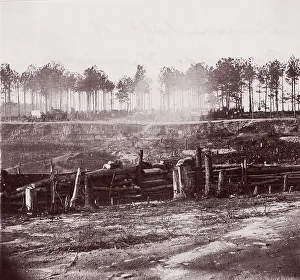
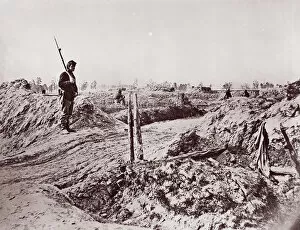
Front of Petersburg Lines, 1864. Creator: Tim O SullivanFront of Petersburg Lines, 1864. Formerly attributed to Mathew B. Brady
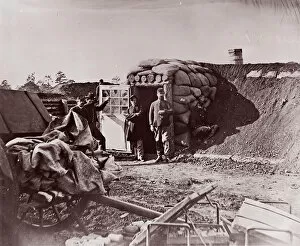
Fort Burnham, front of Petersburg, 1864. Creator: Tim O SullivanFort Burnham, front of Petersburg, 1864. Formerly attributed to Mathew B. Brady
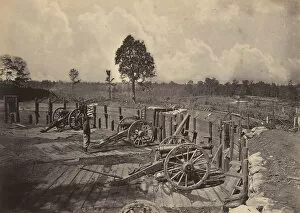
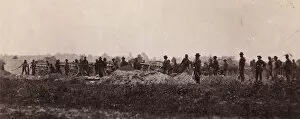
Pennsylvania Light Artillery, Battery B, Petersburg, Virginia, 1864. Formerly attributed to Mathew B. Brady
Outer Confederate Line, Petersburg, Captured June 15, 1864, 1864. Creator: Tim O SullivanOuter Confederate Line, Petersburg, Captured June 15, 1864, 1864. Formerly attributed to Mathew B. Brady
Crows Nest Signal Tower near Bermuda Hundred, 1861-65. Creator: Andrew Joseph RussellCrows Nest Signal Tower near Bermuda Hundred, 1861-65. Formerly attributed to Mathew B. Brady
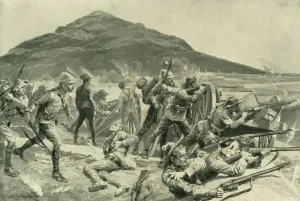
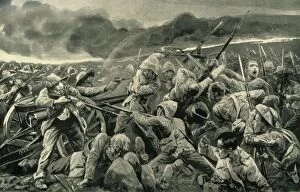
No Surrender! The Defence of Fort Italia on September 26, 1901, 1902" No Surrender!" The Defence of Fort Italia on September 26, 1901, 1902. British forces defend a garrison at Fort Itala, from Boer attack on 26 September 1901
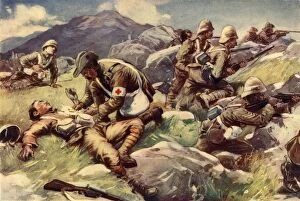
A Non-Combatant Hero - An Army Doctor at Work in the Firing Line, 1902. Creator: UnknownA Non-Combatant Hero - An Army Doctor at Work in the Firing Line, 1902. From " South Africa and the Transvaal War, Vol. VII", by Louis Creswicke. [The Caxton Publishing Co. London, 1902]
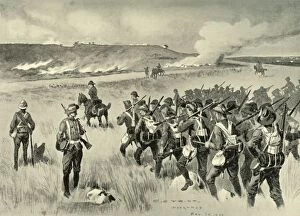
The City of London Imperial Volunteers at Doornkop on the 29th of May, 1901. CreatorThe City of London Imperial Volunteers Supporting General Hamiltons Left Flank in the Action at Doornkop on the 29th of May, 1901
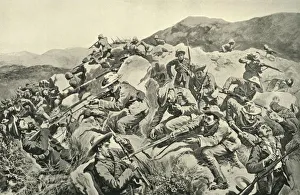
The Engagement at Vlakfontein: The Derbyshires Re-Taking their Guns, 1902. Creator: UnknownThe Engagement at Vlakfontein: The Derbyshires Re-Taking the Guns at the Point of the Bayonet, 1902. The Derbyshire Regiment recapture guns taken by Boers at high cost, 18 were killed and 70 wounded
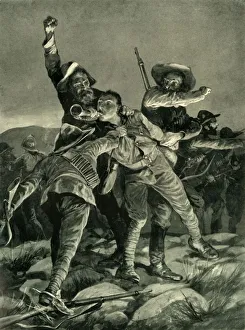
The Gallant Bugler of Fort Itala, 1902. Creator: Richard Caton Woodville IIThe Gallant Bugler of Fort Itala, 1902. British forces defend a garrison at Fort Itala, under Boer attack on the full moon, 26 September 1901. From " South Africa and the Transvaal War, Vol
With General French: New Zealanders Saving a Picket of the Yorkshire Regiment, 1900With General French: New Zealanders Saving a Picket of the Yorkshire Regiment near Slingersfontein on January 15, 1900. From " South Africa and the Transvaal War, Vol
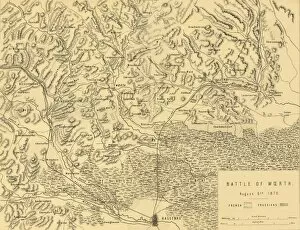
Map of the Battle of Woerth, 6 August 1870, (c1872). Creator: R. WalkerMap of the Battle of Woerth, 6 August 1870, (c1872). Map: Drawn under the Superintendance of Captain Hozier, showing the enemy positions
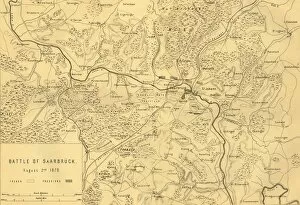
Map of the Battle of Saarbrücken, 2 August 1870, (c1872). Creator: R. WalkerMap of the Battle of Saarbrucken, 2 August 1870, (c1872). Map: Drawn under the Superintendance of Captain Hozier, showing the enemy positions
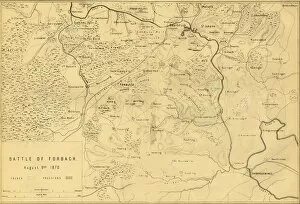
Map of the Battle of Forbach, 6 August 1870, (c1872). Creator: R. WalkerMap of the Battle of Forbach, 6 August 1870, (c1872). Map: Drawn under the Superintendance of Captain Hozier, showing the enemy positions
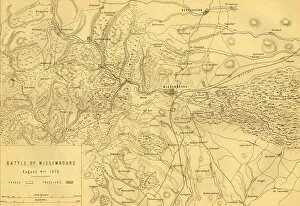
Map of the Battle of Wissembourg, 4 August 1870, (c1872). Creator: R. WalkerMap of the Battle of Wissembourg, 4 August 1870, (c1872). Map: Drawn under the Superintendance of Captain Hozier, showing the enemy positions
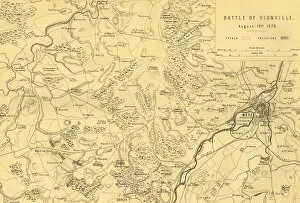
Map of the Battle of Vionville, 16 August 1870, (c1872). Creator: R. WalkerMap of the Battle of Vionville, 16 August 1870, (c1872). Map: Drawn under the Superintendance of Captain Hozier, showing the enemy positions
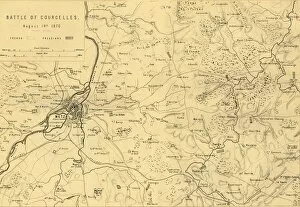
Map of the Battle of Courcelles, 14 August 1870, (c1872). Creator: R. WalkerMap of the Battle of Courcelles, 14 August 1870, (c1872). Map: Drawn under the Superintendance of Captain Hozier, showing the enemy positions
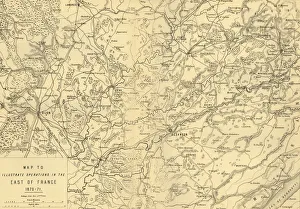
Map to Illustrate Operations in the East of France 1870-71, c1872. Creator: R. WalkerMap to Illustrate Operations in the East of France 1870-71, (c1872). Map: Drawn under the Superintendence of Captain Hozier, showing the towns of Dijon and Besancon
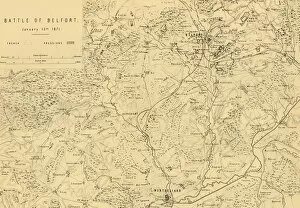
Map of the Battle of Belfort, 15 January 1871, (c1872). Creator: R. WalkerMap of the Battle of Belfort, 15 January 1871, (c1872). Map: Drawn under the Superintendence of Captain Hozier, showing the enemy positions
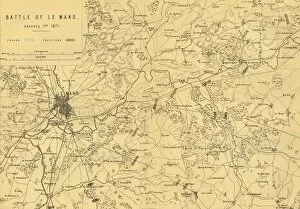
Map of the Battle of Le Mans, 11 January 1871, (c1872). Creator: R. WalkerMap of the Battle of Le Mans, 11 January 1871, (c1872). Map: Drawn under the Superintendence of Captain Hozier, showing the enemy positions
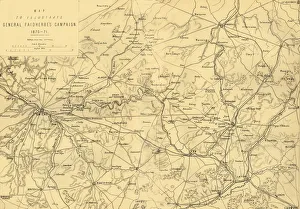
Map to Illustrate General Faidherbes Campaign 1870-71, c1872. Creator: R. WalkerMap to Illustrate General Faidherbes Campaign 1870-71, (c1872). Map of northern France: Drawn under the Superintendance of Captain Hozier, showing the towns of Amiens, Cambrai, St Quentin and Laon
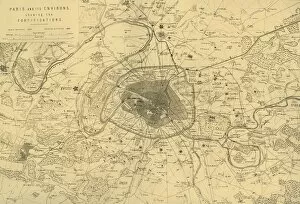
Paris and its Environs, showing the Fortifications, (c1872). Creator: R. WalkerParis and its Environs, showing the Fortifications, (c1872). Map: Drawn under the Superintendence of Captain Hozier, showing French and Prussian batteries (artillery positions)
Map of the Siege of Strasbourg, 1870, (c1872). Creator: R. WalkerMap of the Siege of Strasbourg, 1870, (c1872). Drawn under the Superintendence of Captain Hozier. The city of Strasbourg (in France) underwent bombardment from Prussian general August von Werder
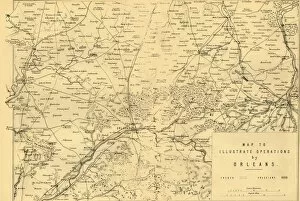
Map to Illustrate Operations by Orleans, (c1872). Creator: R. WalkerMap to Illustrate Operations by Orleans, (c1872). Map: Drawn under the Superintendence of Captain Hozier, showing the enemy positions
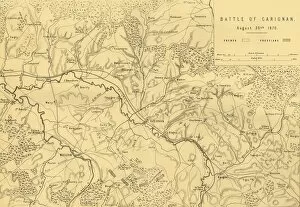
Map of the Battle of Carignan, 30 August 1870, (c1872). Creator: R. WalkerMap of the Battle of Carignan, 30 August 1870, (c1872). Map: Drawn under the Superintendence of Captain Hozier, showing the enemy positions
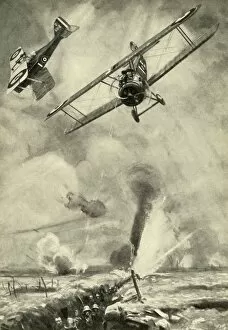
Trench Strafing : British low-flying scouts co-operating in an infantry" Trench Strafing", First World War, (c1920). British low-flying scouts co-operating in an infantry attack on the Western Front. Biplanes shooting at Germans in the trenches
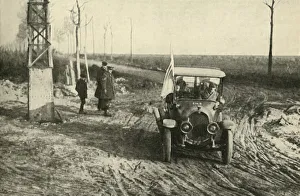
German officers indicating the whereabouts of landmines, First World War, 1918, (c1920). The Armistice: German car, containing German officers sent to reveal the whereabouts of their mines
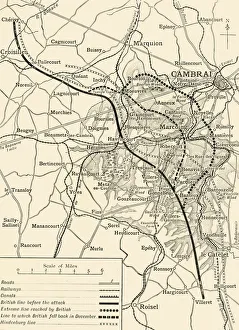
Map illustrating the First Battles of Cambrai, November-December 1917, (c1920). Creator: UnknownMap illustrating the First Battles of Cambrai, November-December 1917, (c1920). Note - Hill shading is shown only in the area covered by the sphere of operations described
The Battles of the Flanders Ridges, July 30-November 26, 1917, (c1920). Creator: UnknownThe Battles of the Flanders Ridges, July 30-November 26, 1917, (c1920)....map illustrating successive stages of the Allies advance...inset
With the Anzacs in Gallipoli: inside an Australian trench, First World War, 1915-1916, (c1920). One man is using a periscope rifle while another keeps watch by means of a periscope
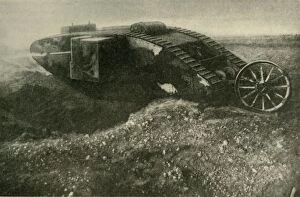
A Tank in Action, First World War, 1914-1918, (c1920). Creator: UnknownA " Tank" in Action, First World War, 1914-1918, (c1920)....one of His Majestys land-ships astride a large shell-hole on the Somme Front
Canadian soldiers on the Somme, northern France, First World War, c1916, (c1920). Creator: UnknownCanadian soldiers on the Somme, northern France, First World War, c1916, (c1920). Canada in the Trenches: fixing bayonets before an assault at Courcelette
King George V at the Somme, northern France, First World War, c1916, (c1920). Creator: UnknownKing George V at the Somme, northern France, First World War, c1916, (c1920). His Majestys Visit to the Somme Battle-field
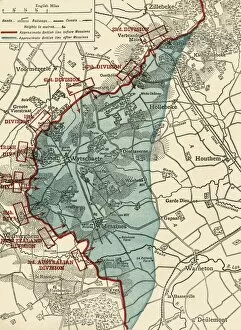
Map to illustrate the Battle of Messines, First World War, June 1917, (c1920). Creator: UnknownMap to illustrate the Battle of Messines, First World War, June 1917, (c1920). The blue area shows ground gained from the Germans by the British under General Sir Herbert Plumer, 7-14 June 1917
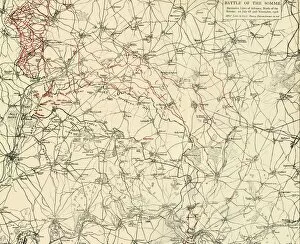
Battle of the Somme, First World War, 1916, (c1920). Creator: UnknownBattle of the Somme, First World War, 1916, (c1920). Successive Lines of Advance, North of the Somme: 1st July till 30th November, 1916
King George V visits the front, West Flanders, Belgium, First World War, 1917, (c1920). Within Range of the German Guns: His Majesty, in field-marshals service uniform and steel helmet
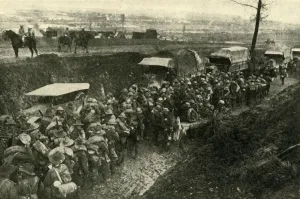
Back from Pozieres: Australian machine-gunners... First World War, 1916, (c1920)Back from Pozieres: Australian machine-gunners returning from the trenches, First World War, 1916, (c1920). ANZAC soldiers on the Western Front in northern France
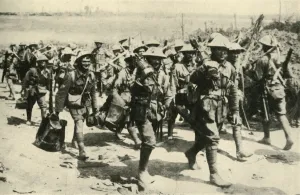
ANZAC soldiers on the Western Front in northern France, First World War, 1916, (c1920). " Advance, Australia!" Commonwealth troops leaving their base camp for the trenches
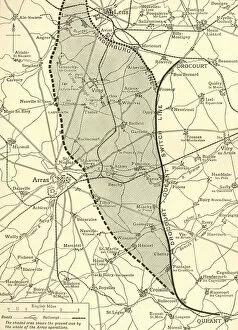
The Battlefield of Arras, First World War, c1917, (c1920) Creator: UnknownThe Battlefield of Arras, First World War, c1917, (c1920)...map showing approximately (by the shaded portion) the ground won by the British armies up to the [German Field Marshal von] Hindenburg
A Corner of the Arras Battlefield, First World War, April 1917, (c1920). Creator: UnknownA Corner of the Arras Battlefield, First World War, April 1917, (c1920)....infantry filing towards the communication-trenches; artillery and a tank coming into action; cavalry (in the distance)
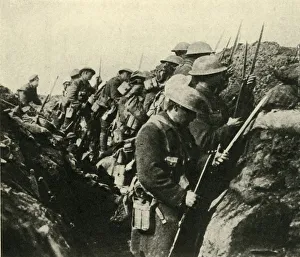
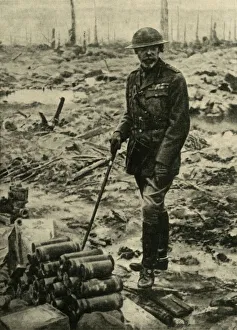
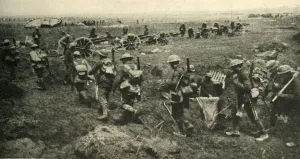
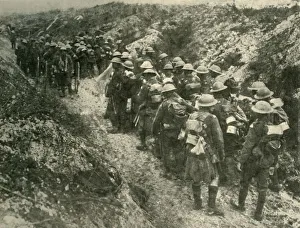
British soldiers at the front, First World War, 1914-1918, (c1920). Creator: UnknownBritish soldiers at the front, First World War, 1914-1918, (c1920). Under the Shelter of a Sunken Road: British troops with ammunition going up to the front line
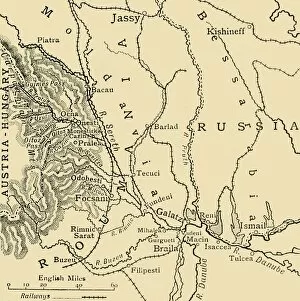
The Russo-Roumanian Retreat to the Sereth Line, First World War, c1916, (c1920). Map of Russian and Romanian positions in eastern Europe