mail_outline sales@mediastorehouse.com
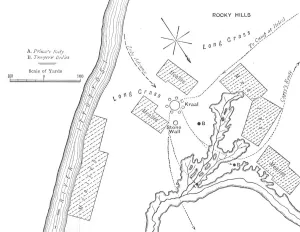
Battle of Tamai: Plan, 1902. The Battle of Tamai, (13 March 1884 ), fought between United kingdom and Sudan. From Battles of the Nineteenth Century, Vol. II
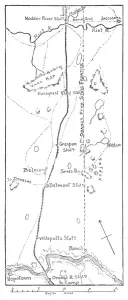
Lord Methuens Line of Advance to the Modder River, 1902. The Second Boer War (1899-1902), South Africa. From Battles of the Nineteenth Century, Vol. III
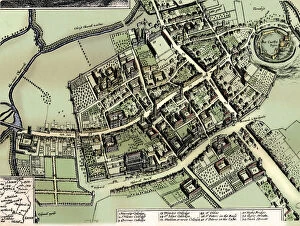
Hollars plan of Oxford, c1643. Artist: Wenceslaus HollarHollars plan of Oxford, c1643. From The Connoisseur Volume XCII, edited by F. Gordon Roe. [The Connoisseur Ltd, London, 1933]. (Colorised black and white print)
Plan of the British Empire Exhibition, Wembley, showing disposition of principal buildings, 1924. From The Architectural Forum Volume XLI. [Rogers and Manson, New York, 1924]
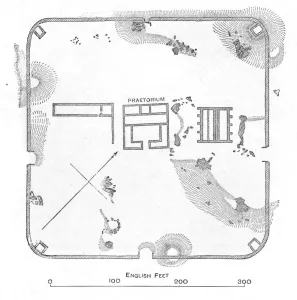
Plan of Hardknott Fort, Cumberland, 1902. Hardknott Roman Fort is an archeological site, the remains of the Roman fort Mediobogdum
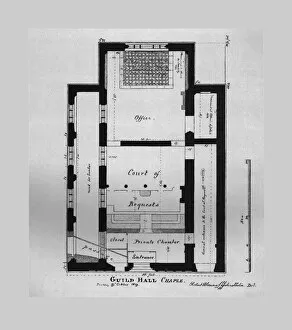
Ground Plan of the Guildhall Chapel 1815, (1866). Lithographic print from the Discriptive Account of the Guildhall of the City of London, 1886
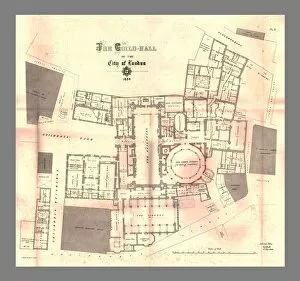
The Guild-Hall of the City of London, Plan, 1884, (1886). Lithographic print from the Discriptive Account of the Guildhall of the City of London, 1886
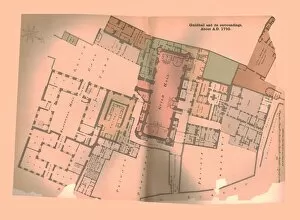
Guild Hall ( City of London) Plan, c1750, (1886)Guildhall ( City of London) Plan, c1750, (1886). Lithographic print from the Discriptive Account of the Guildhall of the City of London, 1886
Guildhall City of London. Plan of Wards and Parishes, 1885, (1886). Guildhall is a Grade I-listed building in the City of London, England
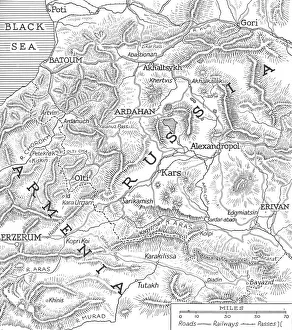
The Russo-Turkish frontiers, 1915. From The Manchester Guardian History of the War, Vol. II. - 1914-15. [John Heywood Ltd, London, 1915]
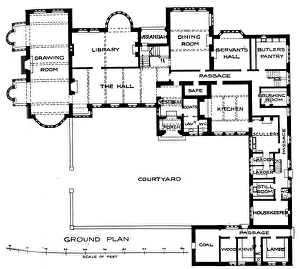
Plan of Maesycrugiau Manor, c1900, (1905). Artist: Arnold MitchellPlan of Maesycrugiau Manor, c1900, (1905). From The Studio Volume 35. [London Offices of the Studio, London, 1905]
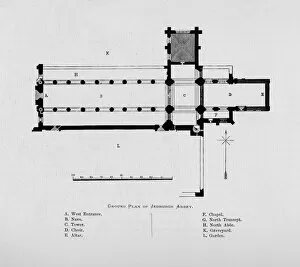
Ground Plan of Jedburgh Abbey, 1897. From The Ruined Abbeys of Britain by Frederick Ross. [William Mackenzie, London, 1897]
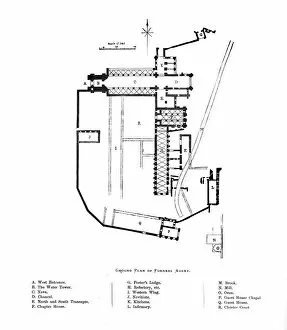
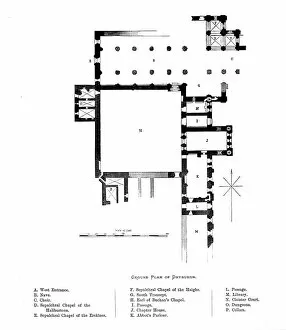
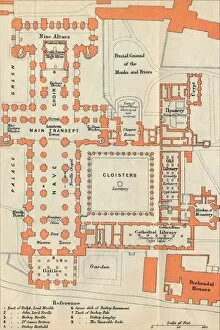
Ground Plan of Furness Abbey, 1897. From The Ruined Abbeys of Britain by Frederick Ross. [William Mackenzie, London, 1897]
Ground Plan of Netley Abbey, 1897. Artist: Alexander Francis LydonGround Plan of Netley Abbey, 1897. From The Ruined Abbeys of Britain by Frederick Ross. [William Mackenzie, London, 1897]
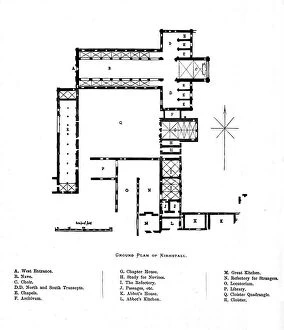
Ground Plan of Kirkstall, 1897. From The Ruined Abbeys of Britain by Frederick Ross. [William Mackenzie, London, 1897]
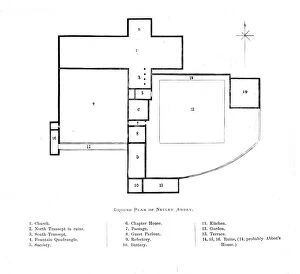
Ground Plan of Dryburgh, 1897. From The Ruined Abbeys of Britain by Frederick Ross. [William Mackenzie, London, 1897]
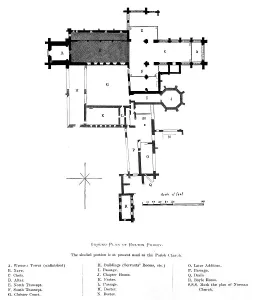
Ground Plan of Bolton Priory, 1897. Artist: Alexander Francis LydonGround Plan of Bolton Priory, 1897. From The Ruined Abbeys of Britain by Frederick Ross. [William Mackenzie, London, 1897]
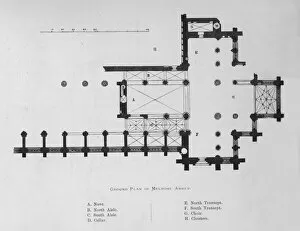
Ground Plan of Melrose Abbey, 1897. From The Ruined Abbeys of Britain by Frederick Ross. [William Mackenzie, London, 1897]
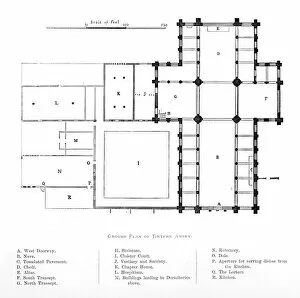
Ground Plan of Tintern Abbey, 1897. From The Ruined Abbeys of Britain by Frederick Ross. [William Mackenzie, London, 1897]
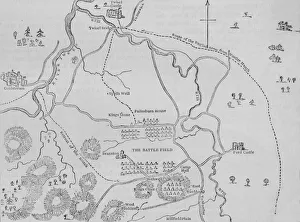
Plan of Flodden Field, 9 September 1513, (c1880). The Battle of Flodden or Flodden Field, or occasionally Battle of Branxton (Brainston Moor)
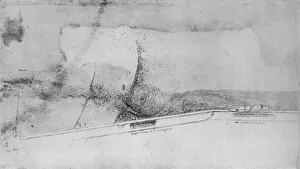
Plan of an Embankment for Diverting the Arno, c1480 (1945). Artist: Leonardo da VinciPlan of an Embankment for Diverting the Arno, c1480 (1945). From The Drawings of Leonardo da Vinci. [Reynal & Hitchcock, New York, 1945]
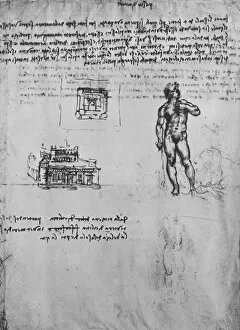
Two Studies of a Nude Figure and the View and Plan of a Building, c1480 (1945). Artist: Leonardo da VinciTwo Studies of a Nude Figure and the View and Plan of a Building, c1480 (1945). From The Drawings of Leonardo da Vinci. [Reynal & Hitchcock, New York, 1945]
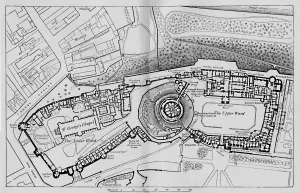
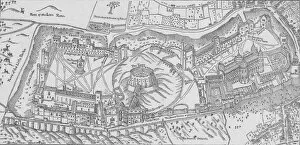
Plan of the Castle, 1895. From The Governors Guide to Windsor Castle, by the Most Noble The Marquis of Lorne, K.T. [Cassell and Company, Limited, London, 1895]
Nordens View of Windsor Castle, 1607. 1895. Artist: John NordenNordens View of Windsor Castle, 1607. 1895. From The Governors Guide to Windsor Castle, by the Most Noble The Marquis of Lorne, K.T. [Cassell and Company, Limited, London, 1895]
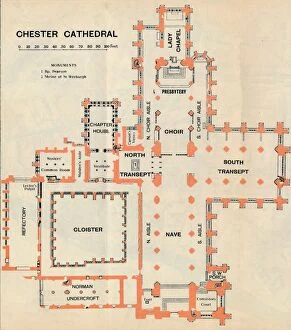
Chester Cathedral, c20th Century. Artist: John BartholomewChester Cathedral, c20th Century. [John Bartholomew & Son, Edinburgh]
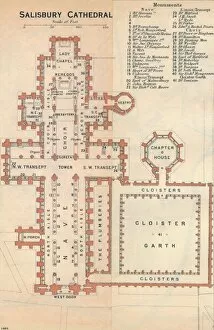
Salisbury Cathedral, c20th Century. Artist: John BartholomewSalisbury Cathedral, c20th Century. [John Bartholomew & Son, Edinburgh]
Exter Cathedral, c20th Century. Artist: John BartholomewExter Cathedral, c20th Century. [John Bartholomew & Son, Edinburgh]
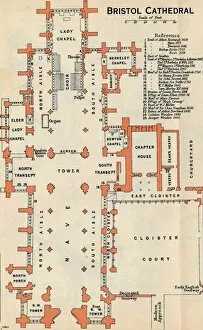
Bristol Cathedral, c20th Century. Artist: John BartholomewBristol Cathedral, c20th Century. [John Bartholomew & Son, Edinburgh]
Wells Cathedral c20th Century. Artist: John BartholomewWells Cathedral, c20th Century. [John Bartholomew & Son, Edinburgh]
Truro Cathedral, c20th Century. Artist: John BartholomewTruro Cathedral, c20th Century. [John Bartholomew & Son, Edinburgh]
Winchester Cathedral, c20th Century. Artist: John BartholomewWinchester Cathedral, c20th Century. [John Bartholomew & Son, Edinburgh]
Chichester Cathedral, c20th Century. Artist: John BartholomewChichester Cathedral, c20th Century. [John Bartholomew & Son, Edinburgh]
Canterbury Cathedral, c20th Century. Artist: John BartholomewCanterbury Cathedral, c20th Century. [John Bartholomew & Son, Edinburgh]
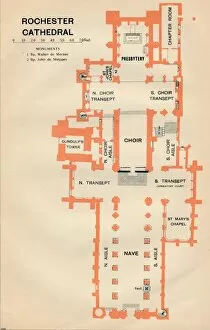
Rochester Cathedral, c20th Century. Artist: John BartholomewRochester Cathedral, c20th Century. [John Bartholomew & Son, Edinburgh]
Norwich Cathedral, c20th Century. Artist: John BartholomewNorwich Cathedral, c20th Century. [John Bartholomew & Son, Edinburgh]
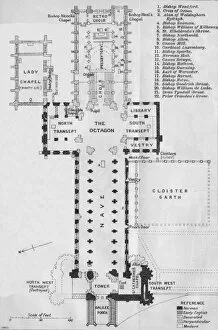
Ely Cathedral, c20th Century. Artist: John BartholomewEly Cathedral, c20th Century. [John Bartholomew & Son, Edinburgh]
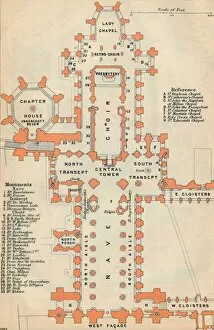
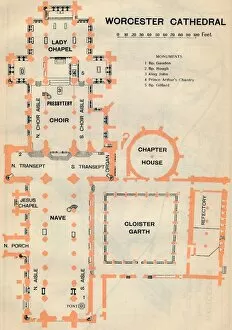
Worcester Cathedral, c20th Century. Artist: John BartholomewWorcester Cathedral, c20th Century. [John Bartholomew & Son, Edinburgh]
Lincoln Cathedral, c20th Century. Artist: John BartholomewLincoln Cathedral, c20th Century. [John Bartholomew & Son, Edinburgh]
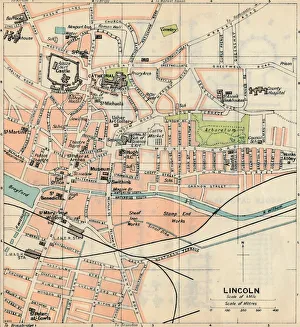
Lincoln, c20th Century. Artist: John BartholomewLincoln, c20th Century. [John Bartholomew & Son, Edinburgh]
Durham Cathedral, c20th Century. Artist: John BartholomewDurham Cathedral, c20th Century. [John Bartholomew & Son, Edinburgh]
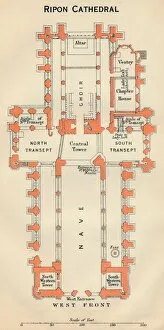
Ripon Cathedral, c20th Century. Artist: John BartholomewRipon Cathedral, c20th Century. [John Bartholomew & Son, Edinburgh]
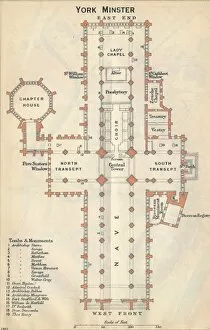
York Minster, c20th Century. Artist: John BartholomewYork Minster, c20th Century. [John Bartholomew & Son, Edinburgh]
Peterborough Cathedral, c20th Century. Artist: John BartholomewPeterborough Cathedral, c20th Century. [John Bartholomew & Son, Edinburgh]
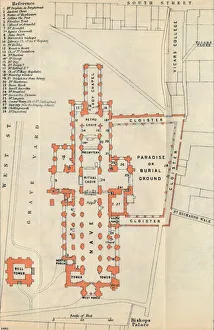
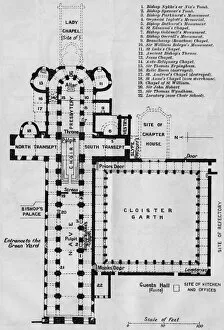
Hereford Cathedral, c20th Century. Artist: John BartholomewHereford Cathedral, c20th Century. [John Bartholomew & Son, Edinburgh]
Plan of the Ground Where Prince Louis Napoleon was killed, (June 1, 1879), c1880. From British Battles on Land and Sea, Vol. IV, by James Grant
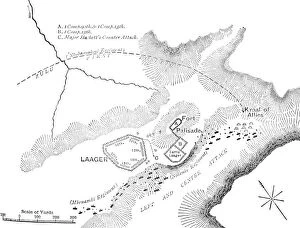
Plan of the Battle of Kambula, (March 29, 1879), c1880Plan of the Battle of Kambula (March 29, 1879), c1880. From British Battles on Land and Sea, Vol. IV, by James Grant. [Cassell Petter & Galpin, London, Paris & Melbourne, c1880]
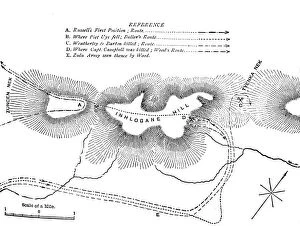
Plan of the Fight on the Inhlobane Mountain, (March 28, 1979), c1880. Episode of the Anglo-Zulu Wars (1879-1896). From British Battles on Land and Sea, Vol. IV, by James Grant
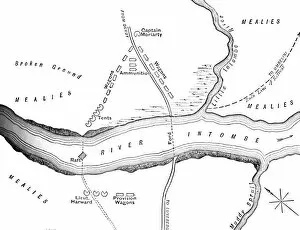
Plan of the Disaster on the Intombe River (March 12, 1879), c1880. From British Battles on Land and Sea, Vol. IV, by James Grant. [Cassell Petter & Galpin, London, Paris & Melbourne, c1880]