mail_outline sales@mediastorehouse.com
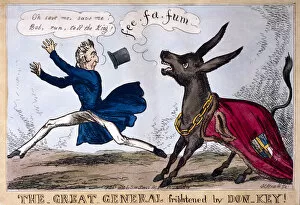
The great general frightened by Don-Key, 1830. Artist: Henry HeathThe great general frightened by Don-Key, 1830; shows the Duke of Wellington running in alarm, from a donkey in mayoral cloak (Sir John Key)
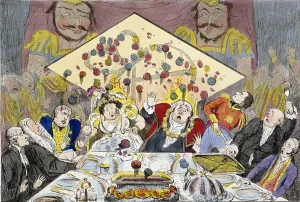
Civic anointing - or - the catastrophe of Lord Mayors Day 1827, vide Guildhall, 1827Civic anointing - or - the catastrophe of Lord Mayors Day 1827, vide Guildhall ; a large board containing fairy lamps plummets towards the new Lord Mayor, Matthias Prime Lucas and guests
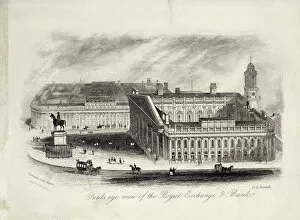
Bird s-eye view of the Royal Exchange, London, c1860. The statue of the Duke of Wellingtob, figures, horses and coaches can be discerned outside
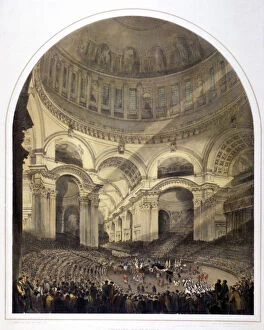
St Pauls Cathedral (new) interior, London, c1852. Artist: Andrew MaclureAn interior view of St Pauls Cathedral, London, showing the funeral of the Duke of Wellington, 1852
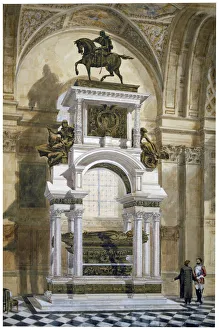
Wellingtons Monument in St Pauls Cathedral, City of London, 1877. ArtistWellingtons Monument in St Pauls Cathedral, City of London, 1877. The memorial to the Duke of Wellington, designed by Alfred Stevens, was completed in 1878
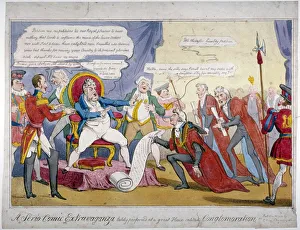
A serio comic extravaganza... 1820. George IV seems to be dismissing a petition from the Lord Mayor, John Thomas Thorp, introduced by Alderman Matthew Wood (?)
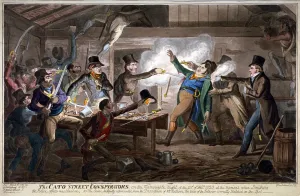
The Cato Street conspirators... 1820. Artist: George CruikshankThe Cato Street conspirators... 1820. Three Bow Street officers have entered the loft above the stable; the foremost, Richard Smithers
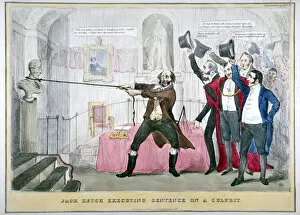
Jack Ketch executing sentence on a culprit, 1832. ArtistJack Ketch executing sentence on a culprit, 1832. A hangman pulls at a rope secured around the neck of a bust of the Duke of Wellington; John Key, Matthew Wood and Robert Waithman cheer him
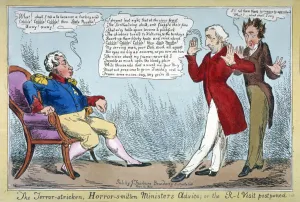
The terror-stricken, horror-smitten ministers advice, or the R[oya]l visit postponed, 1830. The Duke of Wellington, attended by Sir Robert Peel, tells the King, William IV
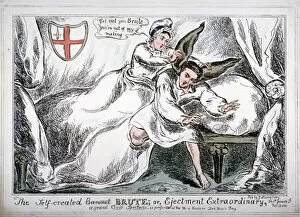
The self created brute... 1830. The Lord Mayors bedroom. A woman representing the City is ejecting the Lord Mayor, Sir John Key
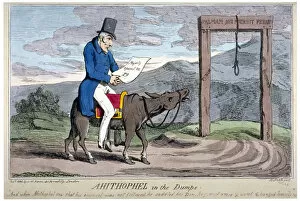
Ahithophel in the dumps, 1830. Artist: Henry HeathAhithophel in the dumps, 1830. The Duke of Wellington on a donkey with a saddle resembling a mayoral gown approaching a gallows
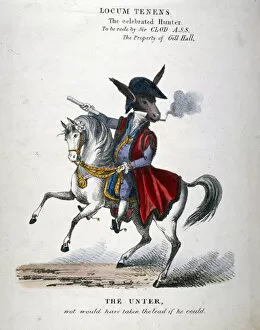
Locum Tenens, the celebrated Hunter, 1830. A donkey in aldermanic costume sitting astride a horse. The cartoon alludes to Sir Claudius Hunters involvement with the cancellation of the Royal visit to
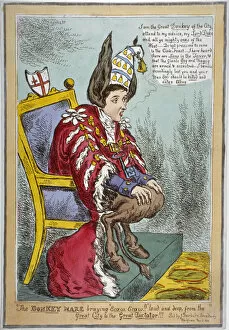
The Donkey Mare... 1830The Donkey Mare, braying Ecaw, ecaw loud and deep, from the great City to the great dictator, 1830. The Lord Mayor, Sir John Key, with asses ears
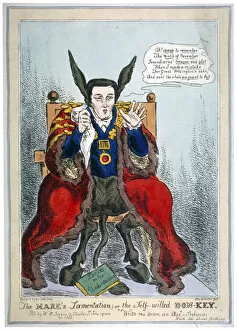
The mares lamentation, or the self-willed Don-Key, 1830. ArtistThe mares lamentation, or the self-willed Don-Key, 1830. Sir John Key, in mayoral robes, with asses ears and legs. The cartoon refers to the cancellation of the Lord Mayors show by Key for fear of
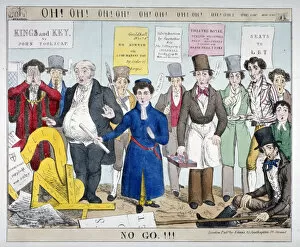
Oh! Oh! Oh! Oh!... No go!!!, 1830. The Lord Mayor, Sir John Key and a variety of City tradesmen and others, including a Christs Hospital scholar
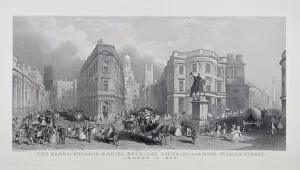
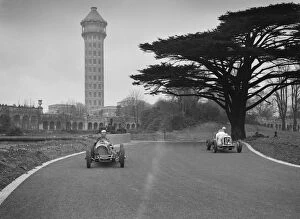
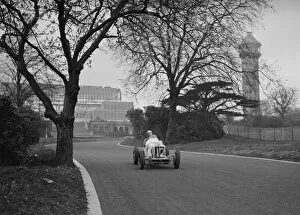
Bank of England, Threadneedle Street, London, (1840?) Artist: Henry WallisView of the Bank of England, Royal Exchange, Cornhill and King William Street, London, 1840(?); with a street scene and horse drawn carriages. Also showing a proposed statue of the Duke of Wellington
New Royal Exchange, City of London, 1839. View showing an alteration to the west front of design no 43 for the new Royal Exchange. Also showing figures and adjacent buildings. Below is a ground plan
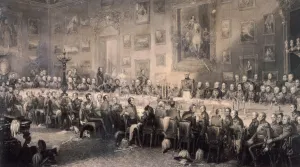
Apsley House, Westminster, London, 1853. Artist: William GreatbachInterior view of Apsley House, Westminster, London, 1853; showing the Duke of Wellington giving the annual banquet for his companions in arms on the anniversary of the Battle of Waterloo
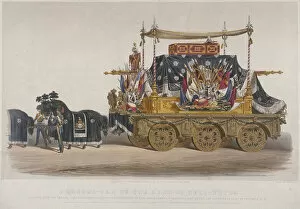
View of the funeral car of the Duke of Wellington, 1852. Artist: Richard RedgraveView of the funeral car of the Duke of Wellington, 1852. Two horses pull a large hearse containing the coffin covered in flags and banners. The carraige is accompanied by two soldiers in uniform
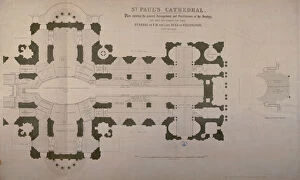
Plan of seating arrangements for the Duke of Wellingtons funeral, 1852Plan showing the seating arrangements for the funeral of the Duke of Wellington, 1852 in St Pauls Cathedral, London
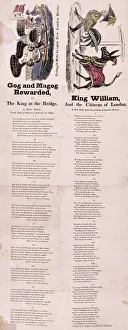
An illustrated songsheet, 1831. Two images with the songs Gog and Magog rewarded and King William and the citizens of London beneath
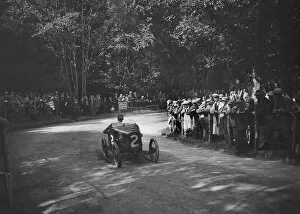
Works Austin 7 of Arthur Waite competing in the MAC Shelsley Walsh Hillclimb, Worcestershire, 1923Austin 747 cc. Event Entry No: 2. Driver: Waite, A. Finished: 1st. in Class 1. The works racing car. Place: M.A.C Shelsley Walsh Hillclimb. Date: 8.9.23
Austin Twenty open tourer of A Waite at the MAC Shelsley Walsh Hillclimb, Worcestershire, 1923Austin Twenty Open tourer. 3610 cc. Vehicle Reg. No. OH6418. Event Entry No: 30. Driver: Waite, A. Place: M.A.C Shelsley Walsh Hillclimb. Date: 8.9.23
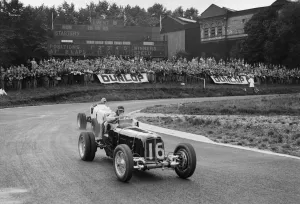
ERAs of Raymond Mays and Arthur Dobson racing at Crystal Palace, London, 1939. Artist: Bill BrunellERA 1980S cc. Event Entry No: 16. Driver: Mays, R. Twin rear wheels. Background: ERA Driver: Dobson, A.C. Twin rear wheels. Place: Crystal Palace Race Meeting. Date: 26.8.39
Riley of AD Whitworth and ERA of Arthur Dobson racing at Crystal Palace, London, 1939Left: Riley 1987 cc. Driver: Whitworth, A.D. Offset-bodied single-seater. Right: ERA 1488S cc. Event Entry No: 12. Driver: Dobson, A.C. Place: Crystal Palace Race Meeting. Date: 1.7.39
ERA of Arthur Dobson racing at Crystal Palace, London, 1939. Artist: Bill BrunellERA 1488S cc. Event Entry No: 12. Driver: Dobson, A.C. Place: Crystal Palace Race Meeting. Date: 1.7.39
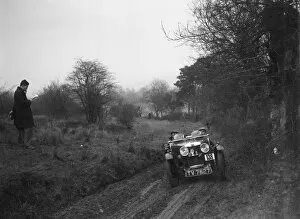
MG J2 of SV Arthur at the Sunbac Colmore Trial, near Winchcombe, Gloucestershire, 1934MG J2 847 cc.Reg. No. TV7827. Event Entry No: 138 Driver: Arthur, S.V. Chassis No. J2010. Gypsy Lane, near Winchcombe Gloucestershire. Sunbac Colmore Trial. Date: 24.2.34
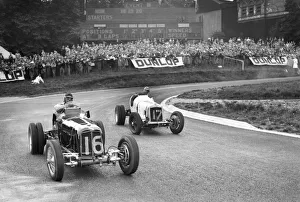
ERAs of Raymond Mays and AC Dobson, Imperial Trophy, Crystal Palace, 1939. Artist: Bill BrunellERA 1980S cc. Event Entry No: 16 Driver: Mays, R. ERA 1488S cc. Event Entry No: 17 Driver: Dobson, A.C. Place: Crystal Palace. Imperial Trophy. Date: 26.8.39
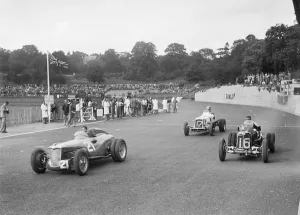
Riley of PW Maclure and ERAs of Raymond Mays and AC Dobson, Imperial Trophy, Crystal Palace, 1939Left: Riley 1487S cc. Event No: 21 Driver: Maclure, P.W Right: ERA 1980S cc. Entry No: 16. Driver: Mays, R. Centre: ERA 1488S cc.t Entry No: 17. Driver: Dobson, A.C. Crystal Palace. Imperial Trophy
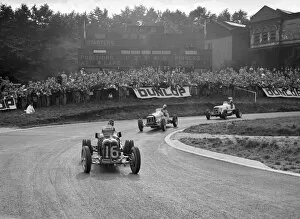
Raymond Mays ERA leading an MG and another ERA, Imperial Trophy, Crystal Palace, 1939ERA 1980S cc. Event Entry No: 16 Driver: Mays, R. MG 1087S cc. Event Entry No: 12 Driver: Nickols, I.H. ERA 1488S cc. Event Entry No: 17 Driver: Dobson, A.C. Place: Crystal Palace. Imperial Trophy
Siegfrieds death, 1924. Artist: Arthur RackhamSiegfrieds death, 1924. Illustration from Siegfried and the Twilight of the Gods. Siegfried, distracted by Wotans ravens, is then stabbed in the back
Siegfried! Siegfried! Our warning is true: flee, oh flee from the curse!, 1924. Illustration from Siegfried and the Twilight of the Gods
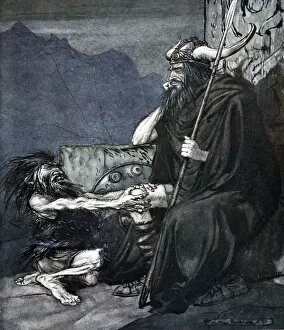
Swear to me, Hagen, my son!, 1924. Artist: Arthur RackhamSwear to me, Hagen, my son!, 1924. Illustration from Siegfried and the Twilight of the Gods. Alberich goes to his son while he is sleeping and implores him to get the ring back
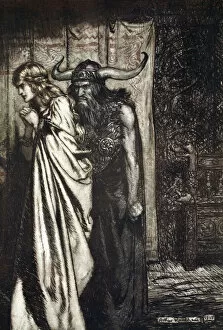
O wife betrayed I will avenge they trust deceived!, 1924. Artist: Arthur RackhamO wife betrayed I will avenge they trust deceived!, 1924. Illustration from Siegfried and the Twilight of the Gods. Brunnhilde thinks Siegfried has intentionally deceived her by taking the ring
The wooing of Grimhilde, the mother of Hagen, 1924. Artist: Arthur RackhamThe wooing of Grimhilde, the mother of Hagen, 1924. Illustration from Siegfried and the Twilight of the Gods. The conception of Hagen. The dwarf Alberich seducing Grimhilde
The ring upon thy hand - ah be implored! For Wotan fling it away!, 1924. ArtistThe ring upon thy hand -..ah be implored! For Wotan fling it away!, 1924. Illustration from Siegfried and the Twilight of the Gods
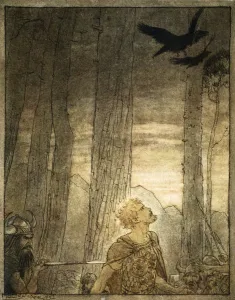
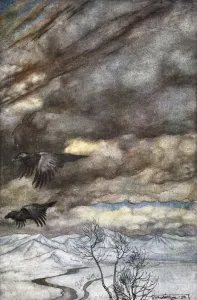
The ravens of Wotan, 1924. Artist: Arthur RackhamThe ravens of Wotan, 1924. Illustration from Siegfried and the Twilight of the Gods. The ravens appear throughout the story
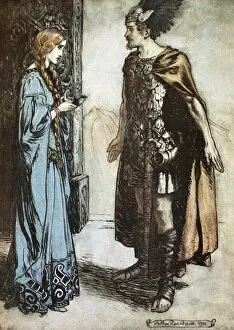
Illustration from Siegfried and the Twilight of the Gods, 1924. Artist: Arthur RackhamIllustration from Siegfried and the Twilight of the Gods, 1924. Siegfried hands the drinking horn back to Gutrune, and gazes at her with sudden passion
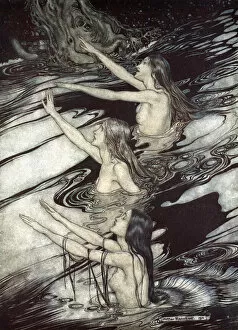
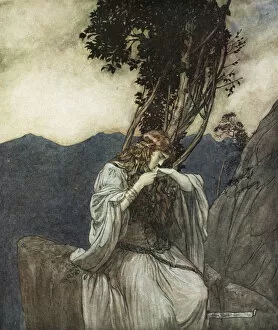
Brunnhilde kisses the ring that Siegfried has left with her, 1924. Illustration from Siegfried and the Twilight of the Gods
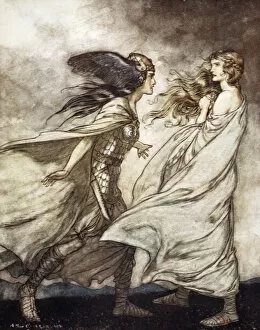
Siegfried leaves Brunnhilde in search of adventure, 1924. Artist: Arthur RackhamSiegfried leaves Brunnhilde in search of adventure, 1924. Illustration from Siegfried and the Twilight of the Gods. Having given Brunnhilde the ring, Siegfried, dressed in full armour
The Norns vanish, 1924. Artist: Arthur RackhamThe Norns vanish, 1924. Illustration from Siegfried and the Twilight of the Gods. The cord which the Norns have been spinning snaps, they wrap the thread around themselves and disappear
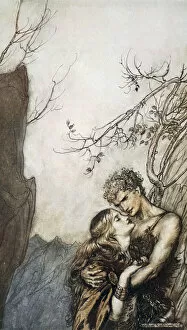
Brunnhilde throws herself into Siegfrieds arms, 1924. Artist: Arthur RackhamBrunnhilde throws herself into Siegfrieds arms, 1924. Illustration from Siegfried and the Twilight of the Gods. Brunnhilde sees Siegfried and also falls in love
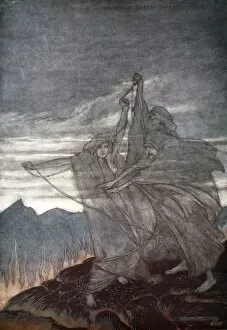
The three Norns, 1924. Artist: Arthur RackhamThe three Norns, 1924. Illustration from Siegfried and the Twilight of the Gods. The three Norns, goddeses of Fate, sit spinning the thread of destiny on the summit of Brunnhildes rock
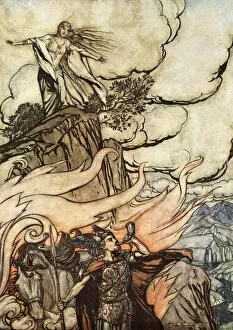
Sun, I hail thee! Hail, O light! Hail, O glorious day!, 1924. Artist: Arthur RackhamSun, I hail thee! Hail, O light! Hail, O glorious day!, 1924. Illustration from Siegfried and the Twilight of the Gods. Brunnhilde awakes and greets the Earth and sky. From a private collection
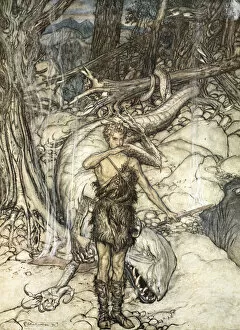
The hot blood burns like fire!, 1924. Artist: Arthur RackhamThe hot blood burns like fire!, 1924. Illustration from Siegfried and the Twilight of the Gods. Siegfried draws his sword from Fafners breast and in doing so gets sprinkled with the dragons blood
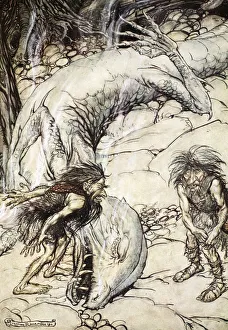
The dwarves quarrelling over the body of Fafner, 1924. Artist: Arthur RackhamThe dwarves quarrelling over the body of Fafner, 1924. Illustration from Siegfried and the Twilight of the Gods. Alberich
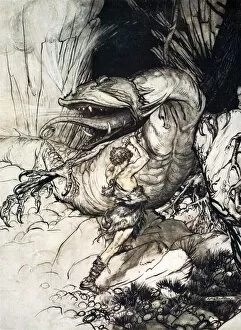
Siegfried kills Fafner, 1924. Artist: Arthur RackhamSiegfried kills Fafner, 1924. Illustration from Siegfried and the Twilight of the Gods. Mime takes Siegfried to Fafners cave and when Siegfried starts playing his horn, Fafner comes out
The forging of Nothung, 1924. Artist: Arthur RackhamThe forging of Nothung, 1924. Illustration from Siegfried and the Twilight of the Gods. Wotan told Mime that only someone without fear would be able to forge Nothung