mail_outline sales@mediastorehouse.com
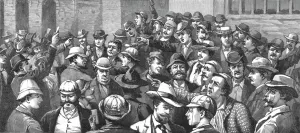
The Transvaal Gold Fields and how to reach them--Scene in the Open-Air Change, Johanne... 1890. Creator: UnknownThe Transvaal Gold Fields and how to reach them--Scene in the Open-Air Change, Johannesburg, 1890
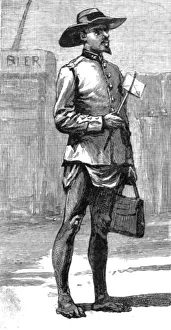
The Transvaal Gold Fields and how to reach them--The Marabastad Post Arrives, 1890. Creator: UnknownThe Transvaal Gold Fields and how to reach them--The Marabastad Post Arrives, 1890
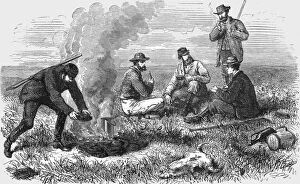
Rest after the Chase; A Buck Hunt in a South African Colony, 1875. Creator: UnknownRest after the Chase; A Buck Hunt in a South African Colony, 1875. From, Illustrated Travels by H.W. Bates. [Cassell, Petter, and Galpin, c1880, London] Belle Sauvage Works.London E.C
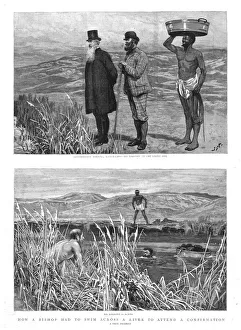
How a Bishop had to swim across a River to attend a Confirmation; Kaffir-land Creator: UnknownHow a Bishop had to swim across a River to attend a Confirmation; Kaffir-land
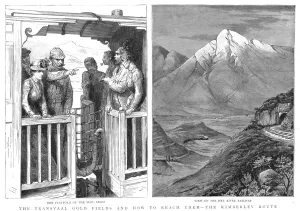
The Transvaal Gold Fields and how to reach them--The Kimberly Route, 1890. Creator: UnknownThe Transvaal Gold Fields and how to reach them--The Kimberly Route, 1890
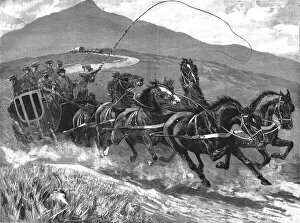
The Transvaal Goldfields and how to reach them--by Coach, Eight in Hand, 1890. Creator: UnknownThe Transvaal Goldfields and how to reach them--by Coach, Eight in Hand, 1890
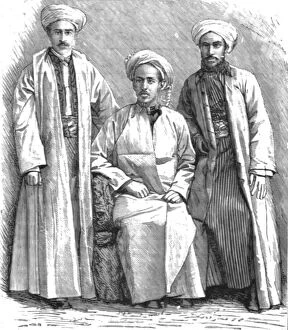
Mahomedanism in Kimberly, South Africa; A group of Mahomedan Priests, 1890. Creator: UnknownMahomedanism in Kimberly, South Africa; A group of Mahomedan Priests, 1890
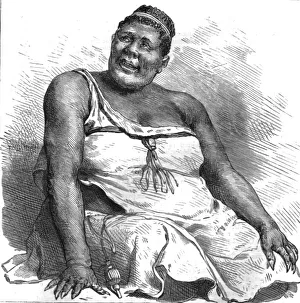
With the Joint Commissionin Swaziland; The Queen of the Swazies, drawn from life, 1890. Creator: UnknownWith the Joint Commissionin Swaziland; The Queen of the Swazies, drawn from life, 1890
Mahomedanism in Kimberly, South Africa; A Malay Masher, 1890. Creator: UnknownMahomedanism in Kimberly, South Africa; A Malay Masher, 1890
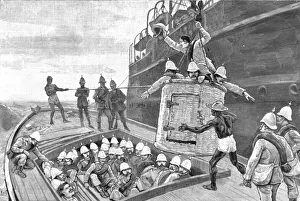
The Recent Disturbances in Zululand; Royal Scots Disembarking at Durban, Natal, 1888. Creator: UnknownThe Recent Disturbances in Zululand; Royal Scots Disembarking at Durban, Natal, 1888. From, The Graphic. An Illustrated Weekly Newspaper Volume 38. July to December, 1888
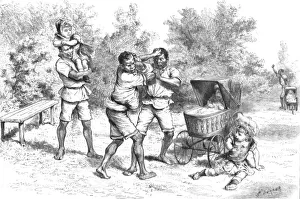
The "Servant Difficulty"in South Africa;Nurseboys quarrelling at Durban, Natal, 1888. Creator: UnknownThe " Servant Difficulty" in South Africa; Nurseboys quarrelling at Durban, Natal, 1888. From, The Graphic. An Illustrated Weekly Newspaper Volume 38. July to December, 1888
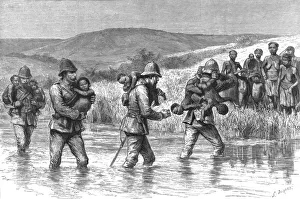
The Rebellion of Dinizulu, son of Cetewayo, in Zululand-The relief of N Dwandwe(after Usibpus def Creator: G Durand)The Rebellion of Dinizulu, son of Cetewayo, in Zululand-The relief of N Dwandwe(after Usibpus defeat by Dinizulu)--Novel duties for the 6th Dragoons: carrying babies across the black Umvoloost, From
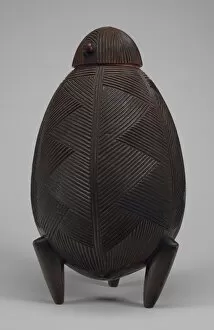
Lidded Container, South Africa, Mid-late 19th century. Creator: UnknownLidded Container, South Africa, Mid-late 19th century
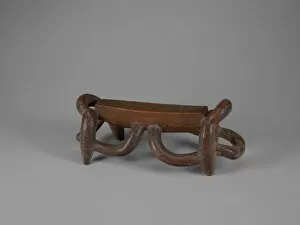
Neckrest (Isicamelo), South Africa, 19th century. Creator: UnknownNeckrest (Isicamelo), South Africa, 19th century
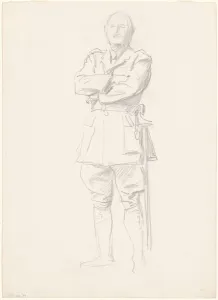
Study of General Louis Botha for "General Officers of World War I", 1920-1922Study of General Louis Botha for " General Officers of World War I", 1920-1922
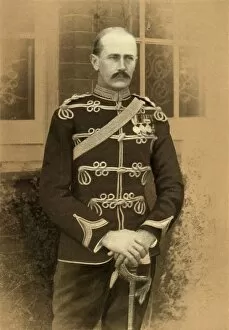
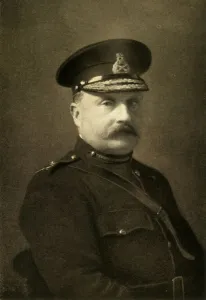
General Bruce Hamilton, 1902. Creator: Russell & SonsGeneral Bruce Hamilton, 1902. Bruce Meade Hamilton (1857-1936) British Army General during the Second Boer War and World War I. From " South Africa and the Transvaal War, Vol
Boers Taking the Oath of Neutrality at Greylingstad, 1901. Creator: Henry Marriott PagetBoers Taking the Oath of Neutrality at Greylingstad, 1901. Boer farmers who took an oath of neutrality were assured safe conduct to their homes
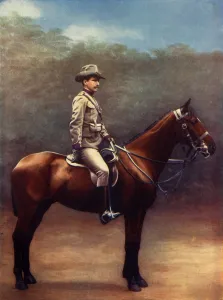
Officer of the Victoria Mounted Rifles, 1901. Creator: Gregory & CoOfficer of the Victoria Mounted Rifles, 1901. The Victoria Mounted Rifles were a regiment of Australian forces who served in the Second Boer War. From " South Africa and the Transvaal War, Vol
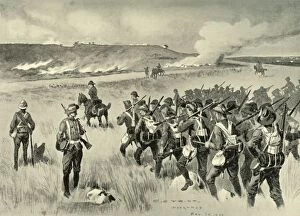
De Wets Attempt to Cross the Railway, 1902. Creator: UnknownDe Wets Attempt to Cross the Railway, 1902. De Wets troops attempt to cross a railway line in Orange River Colony under fire from British troops in a blockhouse
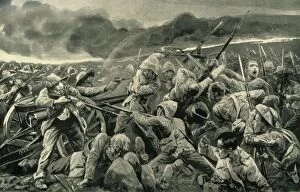
No Surrender! The Defence of Fort Italia on September 26, 1901, 1902" No Surrender!" The Defence of Fort Italia on September 26, 1901, 1902. British forces defend a garrison at Fort Itala, from Boer attack on 26 September 1901
The Battlefields of Pretoria. (From a personal survey). 1901. Creator: UnknownThe Battlefields of Pretoria. (From a personal survey). 1901. From " South Africa and the Transvaal War, Vol. VI", by Louis Creswicke. [T. C. & E. C. Jack, Edinburgh, 1901]
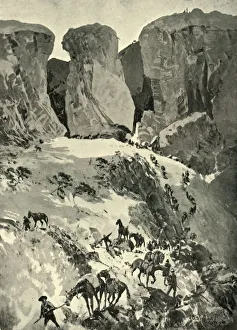
Prinsloos Last Stand in the Valley of the Little Caledon: The Boers Position on the Heights, 1901. Hendrik Frederik Prinsloo (1861-1900)
Prinsloos Commando Retreating to the Brandwater Basin after the Fight at Retiefs Nek, 1901. Hendrik Frederik Prinsloo (1861-1900)
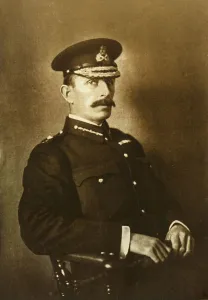
Major-General R. A. P. Clements, 1901. Creator: Elliott & FryMajor-General R. A. P. Clements, 1901. Ralph Arthur Penrhyn Clements (1855- 1909) senior British Army officer appointed a brigade commander during the Second Boer War
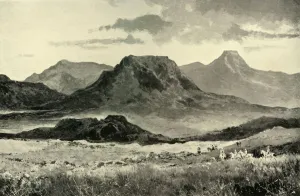
A Historic Battlefield: January-February 1881, and May 1900, 1901. Creator: John Talbot CokeA Historic Battlefield: January-February 1881, and May 1900, 1901. The Battle of Majuba Hill on 27 February 1881 was the final
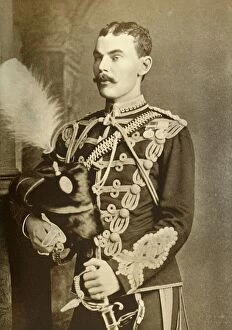
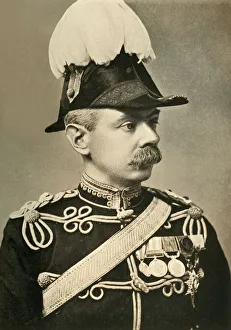
Lieut. -Colonel The Earl of Airlie (12th Lancers), 1901. Creator: Bassano LtdLieut.-Colonel The Earl of Airlie (12th Lancers), 1901. David Ogilvy, 11th Earl of Airlie (1856-1900) Scottish peer of the 12th Royal Lancers who took part in the Battle of Magersfontein
Australian Bushmen on the March, 1901. Creator: Allan StewartAustralian Bushmen on the March, 1901. The Australian mounted Imperial Bushmen regiment was raised in Queensland colony for service during the Second Boer War
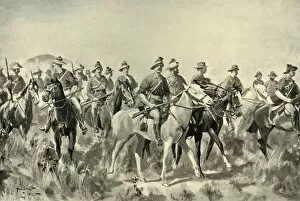
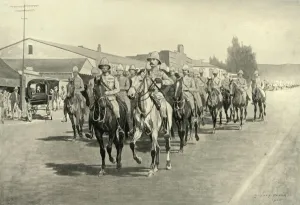
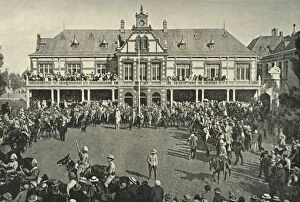
The Entry of Lord Roberts and Staff into Pretoria, 1901. Creator: UnknownThe Entry of Lord Roberts and Staff into Pretoria, 1901. At 2:00 in the afternoon, Pretoria, capital of the South African Republic, surrendered to British General Lord Roberts
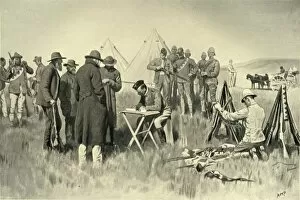
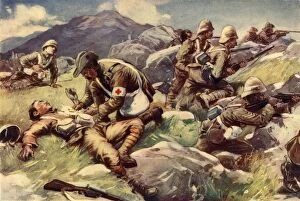
A Non-Combatant Hero - An Army Doctor at Work in the Firing Line, 1902. Creator: UnknownA Non-Combatant Hero - An Army Doctor at Work in the Firing Line, 1902. From " South Africa and the Transvaal War, Vol. VII", by Louis Creswicke. [The Caxton Publishing Co. London, 1902]
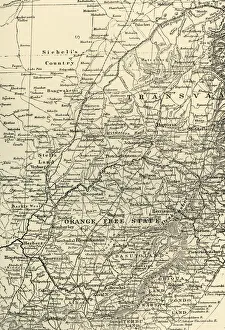
Map of the Seat of War, 1901. Creator: UnknownMap of the Seat of War, 1901. From " South Africa and the Transvaal War, Vol. VI", by Louis Creswicke. [T. C. & E. C. Jack, Edinburgh, 1901]
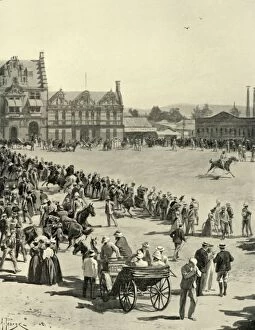
Scene in Pretoria Square, June 5: Waiting for the Entry of Lord Roberts and his Army, 1901. At 2:00 in the afternoon, Pretoria, capital of the South African Republic
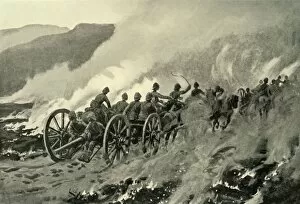
General Bullers Advance: Pursuing the Boers After the Fight on Helpmakaar Heights, 1901. British artillery in pursuit of General Botha on Helpmekaar heights during the Second Boer War
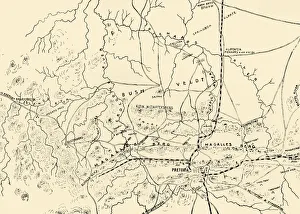
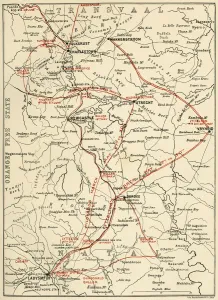
Map Illustrating General Bullers Campaign in Natal - May-June 1900, 1901. Creator: UnknownMap Illustrating General Bullers Campaign in Natal - May-June 1900, 1901. From " South Africa and the Transvaal War, Vol. VI", by Louis Creswicke. [T. C. & E. C. Jack, Edinburgh, 1901]
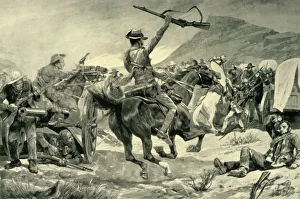
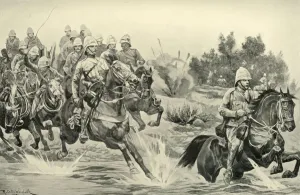
Charge of the Bushmen and New Zealanders on Boer Guns near Klerksdorp, March 24, 1901Charge of the Bushmen and New Zealanders on the Boer Guns During the Attack on Babingtons Convoy near Klerksdorp, March 24, 1901, 1902
The City of London Imperial Volunteers at Doornkop on the 29th of May, 1901. CreatorThe City of London Imperial Volunteers Supporting General Hamiltons Left Flank in the Action at Doornkop on the 29th of May, 1901
General Ian Hamilton Thanking the Gordons for their Attack at the Battle of Doornkop, 1901. The Gordon Highlanders suffered severe losses, in May 1900 in action at Doornkop
The Capture of De Wets Convoy at Reitz, June 6, 1901, 1902. Attack on Boer waggons by Colonel De Lisles Force.. From " South Africa and the Transvaal War, Vol. VII", by Louis Creswicke
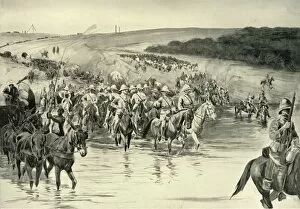
Lord Roberts and His Army Crossing the Wall River, 1901. Creator: RM PaxtonLord Roberts and His Army Crossing the Wall River, 1901. Lord Roberts crossed the Vaal River, a boundary between two Boer republics, to occupy the town of Vereeniging during the Second Boer War
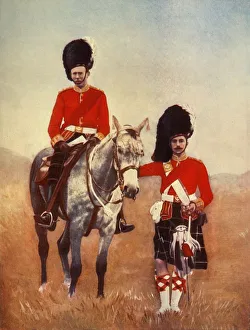
Officers of the Seaforth Highlanders, 1901. Creator: Gregory & CoOfficers of the Seaforth Highlanders, 1901. The Seaforth Highlanders line infantry regiment of the British Army, travelled to South Africa in November 1899
Hauling Down the Transvaal Flag at Johannesburg, 1901. Creator: Lionel JamesHauling Down the Transvaal Flag at Johannesburg, 1901. From " South Africa and the Transvaal War, Vol. V", by Louis Creswicke. [T. C. & E. C. Jack, Edinburgh, 1901]
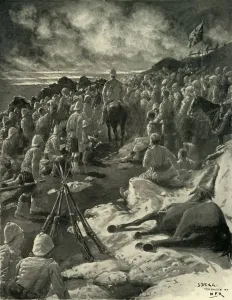
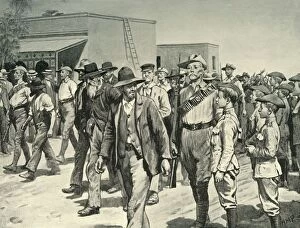
The Last Attack on Mafeking: B. S. A. Police Escorting Boer Prisoners to the Gaol, 1901The Last Attack on Mafeking: B.S.A. Police Escorting Boer Prisoners to the Gaol, 1901. The siege of Mafeking was lifted on 17 May 1900 - British South Africa Police escort Boers to jail
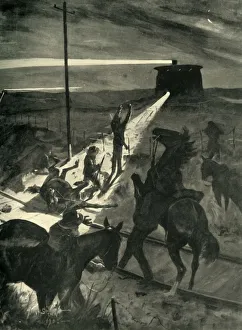
Defeat of a Night Attempt to Cross the Railway, 1902. Creator: Allan StewartDefeat of a Night Attempt to Cross the Railway, 1902. Searchlights, powered by mobile generators, were used to light up the railways against Boer attack at night
Lieut. -Colonel Plumer, 1901. Creator: Bassano LtdLieut.-Colonel Plumer, 1901. Herbert Charles Onslow Plumer (1857-1932) senior British Army officer who led the mounted infantry at the Relief of Mafeking during the Second Boer War
The Great Advance: Royal Horse Artillery (Cavalry Division) Crossing the Vaal, 1901. From " South Africa and the Transvaal War, Vol. V", by Louis Creswicke. [T. C. & E. C
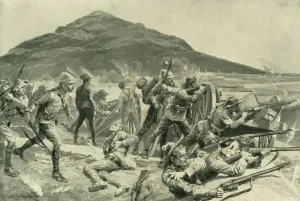
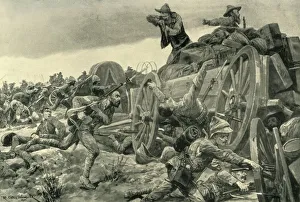
The Engagement at Vlakfontein: The Derbyshires Re-Taking their Guns, 1902. Creator: UnknownThe Engagement at Vlakfontein: The Derbyshires Re-Taking the Guns at the Point of the Bayonet, 1902. The Derbyshire Regiment recapture guns taken by Boers at high cost, 18 were killed and 70 wounded
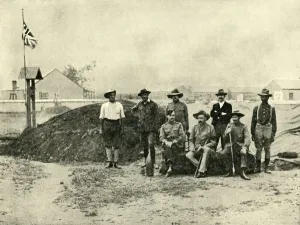
General Baden-Powell, Lord Edward Cecil, and Other Officers, at the Entrance to their " Dug-Out". 1901. Lord Edward Cecil was in the town of Mafeking during siege by the Boers
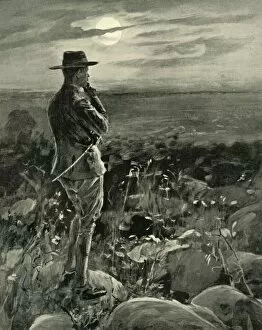
Mafeking: The Wolf That Never Sleeps, 1901. Creator: William HatherellMafeking: " The Wolf That Never Sleeps", 1901. Robert Baden-Powell (1857-1941) British Army officer successfully defended the town during the Siege of Mafeking and was nicknamed Impeesa
Major-General Charles Knox, 1902. Creator: Elliott & FryMajor-General Charles Knox, 1902. Charles Edmond Knox, (1846-1938) Anglo-Irish soldier of the British Army commanded the 13th Infantry Brigade during the Battle of Paardeberg in February 1900