
Print Collector8 Collection (page 14)

Background imagePrint Collector8 Collection: The Model, Lying Down, c1864 (1904). Artist: James Abbott McNeill Whistler

The Model, Lying Down, c1864 (1904). Artist: James Abbott McNeill Whistler
The Model, Lying Down, c1864 (1904). Etching. Plate taken from Whistler As I Knew Him, by Mortimer Menpes, published by Adam and Charles Black (London, 1904)

Background imagePrint Collector8 Collection: Tillie, a Model, 1873 (1904). Artist: James Abbott McNeill Whistler

Tillie, a Model, 1873 (1904). Artist: James Abbott McNeill Whistler
Tillie, a Model, 1873 (1904). Etching. Plate taken from Whistler As I Knew Him, by Mortimer Menpes, published by Adam and Charles Black (London, 1904)

Background imagePrint Collector8 Collection: Moreby Hall, c1883 (1904). Artist: James Abbott McNeill Whistler

Moreby Hall, c1883 (1904). Artist: James Abbott McNeill Whistler
Moreby Hall, c1883 (1904). Watercolour. Plate taken from Whistler As I Knew Him, by Mortimer Menpes, published by Adam and Charles Black (London, 1904)

Background imagePrint Collector8 Collection: Maude, Seated, 19th century (1904). Artist: James Abbott McNeill Whistler

Maude, Seated, 19th century (1904). Artist: James Abbott McNeill Whistler
Maude, Seated, 19th century (1904). First state etching with full face. Plate taken from Whistler As I Knew Him, by Mortimer Menpes, published by Adam and Charles Black (London, 1904)

Background imagePrint Collector8 Collection: Maude, Standing, 1873 (1904). Artist: James Abbott McNeill Whistler

Maude, Standing, 1873 (1904). Artist: James Abbott McNeill Whistler
Maude, Standing, 1873 (1904). Trial proof with light tippet. Plate taken from Whistler As I Knew Him, by Mortimer Menpes, published by Adam and Charles Black (London, 1904)

Background imagePrint Collector8 Collection: The Velvet Dress, 1873 (1904). Artist: James Abbott McNeill Whistler

The Velvet Dress, 1873 (1904). Artist: James Abbott McNeill Whistler
The Velvet Dress, 1873 (1904). Plate taken from Whistler As I Knew Him, by Mortimer Menpes, published by Adam and Charles Black (London, 1904)

Background imagePrint Collector8 Collection: Whistlers Mother, 19th century (1904). Artist: James Abbott McNeill Whistler

Whistlers Mother, 19th century (1904). Artist: James Abbott McNeill Whistler
Whistlers Mother, 19th century (1904). Etching. Plate taken from Whistler As I Knew Him, by Mortimer Menpes, published by Adam and Charles Black (London, 1904)

Background imagePrint Collector8 Collection: The Model Resting, 19th century (1904). Artist: James Abbott McNeill Whistler

The Model Resting, 19th century (1904). Artist: James Abbott McNeill Whistler
The Model Resting, 19th century (1904). Plate taken from Whistler As I Knew Him, by Mortimer Menpes, published by Adam and Charles Black (London, 1904)

Background imagePrint Collector8 Collection: Weary, 1863 (1904). Artist: James Abbott McNeill Whistler

Weary, 1863 (1904). Artist: James Abbott McNeill Whistler
Weary, 1863 (1904). Etching. Plate taken from Whistler As I Knew Him, by Mortimer Menpes, published by Adam and Charles Black (London, 1904)

Background imagePrint Collector8 Collection: Amsterdam, 19th century (1904). Artist: James Abbott McNeill Whistler

Amsterdam, 19th century (1904). Artist: James Abbott McNeill Whistler
Amsterdam, 19th century (1904). Early state etching, drawn from the Tolhuis restaurant. Plate taken from Whistler As I Knew Him, by Mortimer Menpes, published by Adam and Charles Black (London, 1904)

Background imagePrint Collector8 Collection: The Little Forge, c1860 (1904). Artist: James Abbott McNeill Whistler

The Little Forge, c1860 (1904). Artist: James Abbott McNeill Whistler
The Little Forge, c1860 (1904). Etching. An early proof before a monogram. Plate taken from Whistler As I Knew Him, by Mortimer Menpes, published by Adam and Charles Black (London, 1904)

Background imagePrint Collector8 Collection: Millbank, c1860 (1904). Artist: James Abbott McNeill Whistler

Millbank, c1860 (1904). Artist: James Abbott McNeill Whistler
Millbank, c1860 (1904). Etching. A unique impression with the word not added. Plate taken from Whistler As I Knew Him, by Mortimer Menpes, published by Adam and Charles Black (London, 1904)

Background imagePrint Collector8 Collection: The Forge, c1860 (1904). Artist: James Abbott McNeill Whistler

The Forge, c1860 (1904). Artist: James Abbott McNeill Whistler
The Forge, c1860 (1904). Etching Plate taken from Whistler As I Knew Him, by Mortimer Menpes, published by Adam and Charles Black (London, 1904)

Background imagePrint Collector8 Collection: Axenfeld, 1860 (1904). Artist: James Abbott McNeill Whistler

Axenfeld, 1860 (1904). Artist: James Abbott McNeill Whistler
Axenfeld, 1860 (1904). Etching Plate taken from Whistler As I Knew Him, by Mortimer Menpes, published by Adam and Charles Black (London, 1904)

Background imagePrint Collector8 Collection: Rotherhithe, 1860 (1904). Artist: James Abbott McNeill Whistler

Rotherhithe, 1860 (1904). Artist: James Abbott McNeill Whistler
Rotherhithe, 1860 (1904). Etching. Rotherhithe was drarn from the balcony of the Angel Inn at Rotherhithe, looking northwest toward the City

Background imagePrint Collector8 Collection: Mr Mann, 1860 (1904). Artist: James Abbott McNeill Whistler

Mr Mann, 1860 (1904). Artist: James Abbott McNeill Whistler
Mr Mann, 1860 (1904). Etching. Plate taken from Whistler As I Knew Him, by Mortimer Menpes, published by Adam and Charles Black (London, 1904)

Background imagePrint Collector8 Collection: Under Old Battersea Bridge, 1879 (1904). Artist: James Abbott McNeill Whistler

Under Old Battersea Bridge, 1879 (1904). Artist: James Abbott McNeill Whistler
Under Old Battersea Bridge, 1879 (1904). Plate taken from Whistler As I Knew Him, by Mortimer Menpes, published by Adam and Charles Black (London, 1904)

Background imagePrint Collector8 Collection: Fumettes Bent Head, c1859 (1904). Artist: James Abbott McNeill Whistler

Fumettes Bent Head, c1859 (1904). Artist: James Abbott McNeill Whistler
Fumettes Bent Head, c1859 (1904). Plate taken from Whistler As I Knew Him, by Mortimer Menpes, published by Adam and Charles Black (London, 1904)

Background imagePrint Collector8 Collection: The Miser, c1851 (1904). Artist: James Abbott McNeill Whistler

The Miser, c1851 (1904). Artist: James Abbott McNeill Whistler
The Miser, c1851 (1904). Plate taken from Whistler As I Knew Him, by Mortimer Menpes, published by Adam and Charles Black (London, 1904)

Background imagePrint Collector8 Collection: Fumette, Standing 1859 (1904). Artist: James Abbott McNeill Whistler

Fumette, Standing 1859 (1904). Artist: James Abbott McNeill Whistler
Fumette, Standing 1859 (1904). Plate taken from Whistler As I Knew Him, by Mortimer Menpes, published by Adam and Charles Black (London, 1904)

Background imagePrint Collector8 Collection: Tyzac Whiteley and Co, 1859 (1904). Artist: James Abbott McNeill Whistler

Tyzac Whiteley and Co, 1859 (1904). Artist: James Abbott McNeill Whistler
Tyzac Whiteley and Co, 1859 (1904). Plate taken from Whistler As I Knew Him, by Mortimer Menpes, published by Adam and Charles Black (London, 1904)

Background imagePrint Collector8 Collection: Whistler, 1859 (1904). Artist: James Abbott McNeill Whistler

Whistler, 1859 (1904). Artist: James Abbott McNeill Whistler
Whistler, 1859 (1904). Plate taken from Whistler As I Knew Him, by Mortimer Menpes, published by Adam and Charles Black (London, 1904)

Background imagePrint Collector8 Collection: Limehouse, 19th century (1904). Artist: James Abbott McNeill Whistler

Limehouse, 19th century (1904). Artist: James Abbott McNeill Whistler
Limehouse, 19th century (1904). Plate taken from Whistler As I Knew Him, by Mortimer Menpes, published by Adam and Charles Black (London, 1904)

Background imagePrint Collector8 Collection: Thames Warehouse, 19th century (1904). Artist: James Abbott McNeill Whistler

Thames Warehouse, 19th century (1904). Artist: James Abbott McNeill Whistler
Thames Warehouse, 19th century (1904). Plate taken from Whistler As I Knew Him, by Mortimer Menpes, published by Adam and Charles Black (London, 1904)

Background imagePrint Collector8 Collection: A Bye Canal, Venice, 19th century, (1904). Artist: James Abbott McNeill Whistler

A Bye Canal, Venice, 19th century, (1904). Artist: James Abbott McNeill Whistler
A Bye Canal, Venice, 19th century, (1904). From a pastel. Plate taken from Whistler As I Knew Him, by Mortimer Menpes, published by Adam and Charles Black (London, 1904)

Background imagePrint Collector8 Collection: Street at Saverne, 19th century (1904). Artist: James Abbott McNeill Whistler

Street at Saverne, 19th century (1904). Artist: James Abbott McNeill Whistler
Street at Saverne, 19th century (1904). Plate taken from Whistler As I Knew Him, by Mortimer Menpes, published by Adam and Charles Black (London, 1904)

Background imagePrint Collector8 Collection: The Wood, 19th century (1904). Artist: James Abbott McNeill Whistler

The Wood, 19th century (1904). Artist: James Abbott McNeill Whistler
The Wood, 19th century (1904). Signed by J M Whistler and Seymour Haden and done in collaboration. Plate taken from Whistler As I Knew Him, by Mortimer Menpes

Background imagePrint Collector8 Collection: A NASA Mercury-Atlas Module, c1960s. Artist: NASA

A NASA Mercury-Atlas Module, c1960s. Artist: NASA
A NASA Mercury-Atlas Module, c1960s

Background imagePrint Collector8 Collection: A futuristic view of living in space, c1970s. Artist: NASA

A futuristic view of living in space, c1970s. Artist: NASA
A futuristic view of living in space, c1970s

Background imagePrint Collector8 Collection: Inside a futuristic space station, c1970s. Artist: NASA

Inside a futuristic space station, c1970s. Artist: NASA
Inside a futuristic space station, c1970s

Background imagePrint Collector8 Collection: The crew of Apollo 8 in front of a simulator, 1968. Artist: NASA

The crew of Apollo 8 in front of a simulator, 1968. Artist: NASA
The crew of Apollo 8 in front of a simulator, 1968. From left to right: James A. Lovell, Jr (Command Module pilot); William A. Anders (Lunar Module pilot) and Frank F. Borman, II (mission commander)

Background imagePrint Collector8 Collection: An astronaut inside a NASA Command Module, 1970s. Artist: NASA

An astronaut inside a NASA Command Module, 1970s. Artist: NASA
An astronaut inside a NASA Command Module, 1970s

Background imagePrint Collector8 Collection: Alfred M. Worden (b1932) during the Apollo 15 lunar mission, 1971. Artist: NASA

Alfred M. Worden (b1932) during the Apollo 15 lunar mission, 1971. Artist: NASA
Alfred M. Worden (b1932) during the Apollo 15 lunar mission, 5th August 1971

Background imagePrint Collector8 Collection: The Apollo 15 lunar mission insignia, 1971. Artist: NASA

The Apollo 15 lunar mission insignia, 1971. Artist: NASA
The Apollo 15 lunar mission insignia, 1971

Background imagePrint Collector8 Collection: Apollo 15 on the launch pad at Kennedy Space Center, Florida, USA, 1971. Artist: NASA

Apollo 15 on the launch pad at Kennedy Space Center, Florida, USA, 1971. Artist: NASA
Apollo 15 on the launch pad at Kennedy Space Center, Florida, USA, 13th July 1971

Background imagePrint Collector8 Collection: The lift off of Apollo 15, Kennedy Space Center, Florida, USA, 1971. Artist: NASA

The lift off of Apollo 15, Kennedy Space Center, Florida, USA, 1971. Artist: NASA
The lift off of Apollo 15, Kennedy Space Center, Florida, USA, 26th July 1971

Background imagePrint Collector8 Collection: The Apollo 15 capsule lands safely despite a parachute failure, Mid-Pacific Ocean, 1971

The Apollo 15 capsule lands safely despite a parachute failure, Mid-Pacific Ocean, 1971. Artist: NASA
The Apollo 15 capsule lands safely despite a parachute failure, Mid-Pacific Ocean, 7th August 1971

Background imagePrint Collector8 Collection: The Mission Operations Control Room in Mission Control Centre, Houston, Texas, USA, 1971

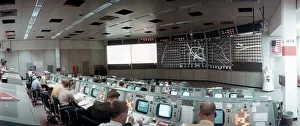
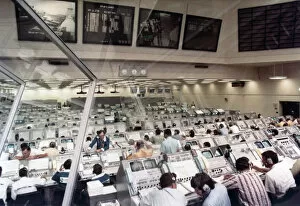
The Mission Operations Control Room in Mission Control Centre, Houston, Texas, USA, 1971. ston, 1971. Artist: NASA
The Mission Operations Control Room in Mission Control Centre, Houston, Texas, USA, 1971. This photograph was taken minutes after the launch of the Apollo 15 lunar landing mission, 26th July 1971

Background imagePrint Collector8 Collection: James Irwin (1930-1991) with the Lunar Roving Vehicle during Apollo 15, 1971. Artist: NASA

James Irwin (1930-1991) with the Lunar Roving Vehicle during Apollo 15, 1971. Artist: NASA
James Irwin (1930-1991) with the Lunar Roving Vehicle during Apollo 15, 1971. Irwin works on the Lunar Roving Vehicle during the first Apollo 15 lunar surface extravehicular activity (EVA-1)

Background imagePrint Collector8 Collection: Edwin Buzz Aldrin descends the steps of the Lunar Module ladder to walk on the Moon, 1969

Edwin Buzz Aldrin descends the steps of the Lunar Module ladder to walk on the Moon, 1969. Artist: NASA
Edwin Buzz Aldrin (b1930) descends the steps of the Lunar Module ladder to walk on the Moon, 1969. This photograph was taken by Neil Armstrong

Background imagePrint Collector8 Collection: Astronaut James Irwin (1930-1991) gives a salute on the Moon, 1971. Artist: NASA

Astronaut James Irwin (1930-1991) gives a salute on the Moon, 1971. Artist: NASA
Astronaut James Irwin (1930-1991) gives a salute on the Moon, 1971. Irwin, pilot of the Lunar Module, gives a military salute while standing beside the deployed U.S

Background imagePrint Collector8 Collection: A NASA Lunar Module, c1970s. Artist: NASA

A NASA Lunar Module, c1970s. Artist: NASA
A NASA Lunar Module, c1970s

Background imagePrint Collector8 Collection: Astronaut David Scott (b1932) on the slope of Hadley Delta during Apollo 15, 1971. Artist: NASA

Astronaut David Scott (b1932) on the slope of Hadley Delta during Apollo 15, 1971. Artist: NASA
Astronaut David Scott (b1932) on the slope of Hadley Delta during Apollo 15, 1971. David Scott, mission commander, with tongs and gnomon in hand

Background imagePrint Collector8 Collection: The launch of Skylab 2, Kennedy Space Center, Florida, USA, 1973. Artist: NASA

The launch of Skylab 2, Kennedy Space Center, Florida, USA, 1973. Artist: NASA
The launch of Skylab 2, Kennedy Space Center, Florida, USA, 1973

Background imagePrint Collector8 Collection: The Apollo 15 Command and Service Modules in lunar orbit, 1971. Artist: NASA

The Apollo 15 Command and Service Modules in lunar orbit, 1971. Artist: NASA
The Apollo 15 Command and Service Modules in lunar orbit, 1971. Photographed from the Lunar Module just after rendezvous, looking southeast into the Sea of Fertility

Background imagePrint Collector8 Collection: The crew of Space Shuttle Mission STS-31, 1990. Artist: NASA

The crew of Space Shuttle Mission STS-31, 1990. Artist: NASA
The crew of Space Shuttle Mission STS-31, 1990. STS-31 was the thirty-fifth mission of the American Space Shuttle program

Background imagePrint Collector8 Collection: John Watts Young (b1930), NASA astronaut, c1990s. Artist: NASA

John Watts Young (b1930), NASA astronaut, c1990s. Artist: NASA
John Watts Young (b1930), NASA astronaut, c1990s. John Watts Young is a former NASA astronaut who walked on the Moon on April 21 1972, during the Apollo 16 mission

Background imagePrint Collector8 Collection: The Opposition Coaches, 1837 (1927). Artist: Charles Cooper Henderson

The Opposition Coaches, 1837 (1927). Artist: Charles Cooper Henderson
The Opposition Coaches, 1837 (1927). Plate taken from Famous Sporting Prints IV: Coaching, published by The Studio Limited (London, 1927)


All Professionally Made to Order for Quick Shipping