mail_outline sales@mediastorehouse.com
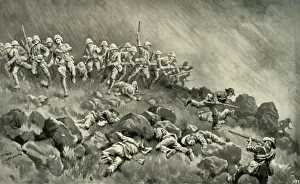
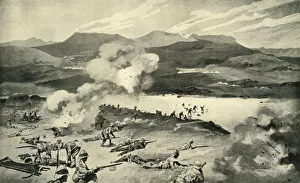
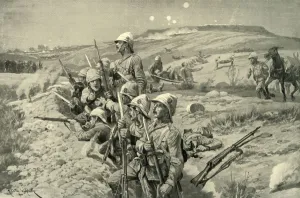
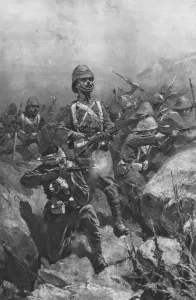
The Great Assault on Ladysmith - The Devons Clearing Wagon Hill, 1900. Creator: William T MaudThe Great Assault on Ladysmith - The Devons Clearing Wagon Hill, 1900. The Battle of Wagon Hill took place during the Siege of Ladysmith in South Africa in 1900
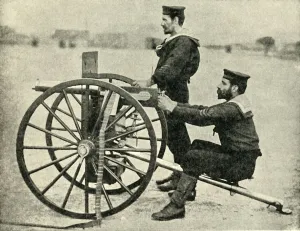
Types of Arms - The Maxim Gun, 1900. Creator: Gregory & CoTypes of Arms - The Maxim Gun, 1900. From " South Africa and the Transvaal War, Vol. II", by Louis Creswicke. [T. C. & E. C. Jack, Edinburgh, 1900]
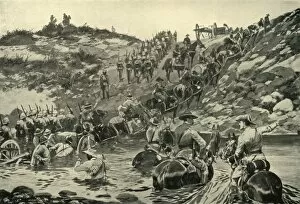
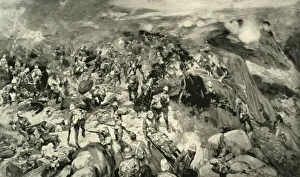
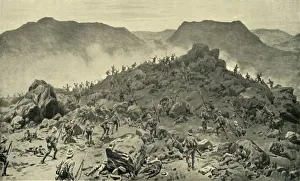
Fighting Mac and the Highland Brigade in Action at Koodoesberg, 1900" Fighting Mac" and the Highland Brigade in Action at Koodoesberg, 1900. General MacDonald took a position at Koodoesberg drift on the Modder River
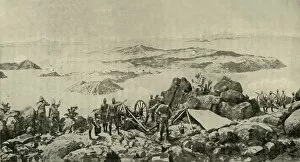
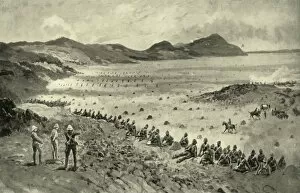
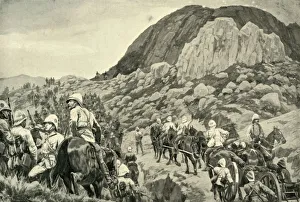
General Frenchs Remarkable Position at Colesberg, c15th January, 1900 CreatorGeneral Frenchs Remarkable Position at Colesberg, as seen from Kul or Coles Kop about 15th January, 1900. French did not succeed in capturing Colesberg
The Battle of Colenso - The Dublin Fusiliers Attempt to Ford the Tugela, 1900. CreatorsThe Battle of Colenso - The Dublin Fusiliers Attempt to Ford the Tugela, 1900. From " South Africa and the Transvaal War, Vol. II", by Louis Creswicke. [T. C. & E. C. Jack, Edinburgh, 1900]
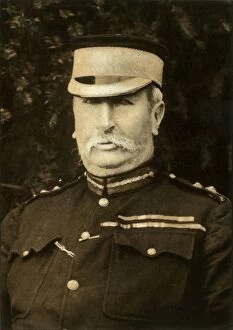
Rt. Hon. Sir Redvers Henry Buller, K. C. B. V. C. 1900. Creator: KnightRt. Hon. Sir Redvers Henry Buller, K.C.B. V.C. 1900. From " South Africa and the Transvaal War, Vol. II", by Louis Creswicke. [T. C. & E. C. Jack, Edinburgh, 1900]
Before Ladysmith - Horse Artillery Galloping to Take Up a New Position, 1900. CreatorBefore Ladysmith - Horse Artillery Galloping to Take Up a New Position, 1900. From " South Africa and the Transvaal War, Vol. II", by Louis Creswicke. [T. C. & E. C. Jack, Edinburgh, 1900]
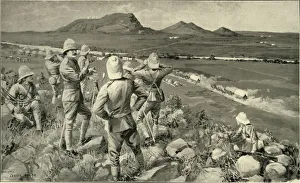
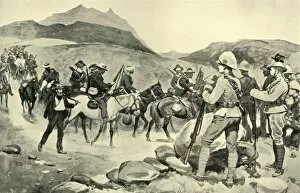
With General French: New Zealanders Saving a Picket of the Yorkshire Regiment, 1900With General French: New Zealanders Saving a Picket of the Yorkshire Regiment near Slingersfontein on January 15, 1900. From " South Africa and the Transvaal War, Vol
A Picket of 13th Hussars Surprised Near the Tugela River (Hussar Hill), 1900. CreatorA Picket of 13th Hussars Surprised Near the Tugela River (Hussar Hill), 1900. The Battle of Tugela (or Thukela) Heights, was a series of military actions lasting from 14 to 27 February 1900 in which
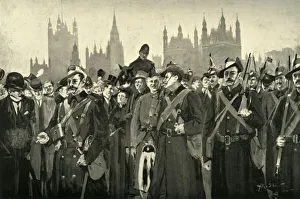
Officers - City of London Imperial Volunteers, 1900. Creator: Gregory & CoOfficers - City of London Imperial Volunteers, 1900. The City Imperial Volunteers Crossing Westminster Bridge, 1900. The City of London Imperial Volunteers (CIV)
Londons Response - The City Imperial Volunteers Crossing Westminster Bridge, 1900. The City of London Imperial Volunteers (CIV) was a British corps of volunteers during the Second Boer War
The Battle of Colenso - Queens (Royal West Surrey) Regiment Leading the Central Attack, 1900. From " South Africa and the Transvaal War, Vol. II", by Louis Creswicke. [T. C. & E. C
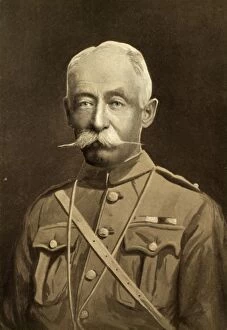
General Brabant, C. M. G. 1900. Creator: UnknownGeneral Brabant, C.M.G. 1900. Edward Yewd Brabant (1839-1914) British military commander in colonial South Africa commanding the Colonial Division in 1900
Stormberg Pass - The Scene of General Gatacres Operations, 1900. Creator: HC Seppings WrightStormberg Pass - The Scene of General Gatacres Operations, 1900. From " South Africa and the Transvaal War, Vol. II", by Louis Creswicke. [T. C. & E. C. Jack, Edinburgh, 1900]
The Surrender of Prinsloos Force at the Caledon River, 1901. Creator: Ernest PraterThe Surrender of Prinsloos Force at the Caledon River, 1901. Surrender of Hendrik Frederik Prinsloo (1861-1900) Boer Carolina Commando infantry regiment on 30 July 1900
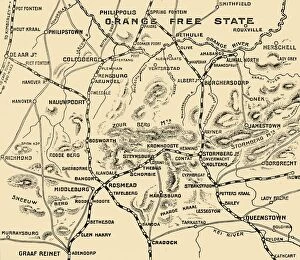
Movements of Gatacre and French, 1900. Creator: UnknownMovements of Gatacre and French, 1900. William Forbes Gatacre commanded the British Army at the Battle of Omdurman and the 3rd Division during the first months of the Second Boer War
Hon. W. P. Schreiner, C. M. G. Premier of the Cape Parliament, 1898-1900, 1900. CreatorHon. W. P. Schreiner, C.M.G. Premier of the Cape Parliament, 1898-1900, 1900. William Philip Schreiner (1857-1919) barrister, politician
Lady Minto Presenting Colours to Herchmers Horse, on Leaving Ottawa, 19th Jan. 1900, 1900. Mary Caroline Grey Wife Of Governor General Of Canada presents colours to Canadian troops before they left
Colonel W. D. Otter, 1900. Creator: UnknownColonel W. D. Otter, 1900. William Dillon Otter (1843-1929) Canadian commander of the 2nd Battalion of The Royal Canadian Regiment of Infantry in South Africa who played an important part in
Lieut. -General Sir Charles Warren, G. C. M. G. 1900. Creator: Elliott & FryLieut.-General Sir Charles Warren, G.C.M.G. 1900. Sir Charles Warren (1840-1927) an officer in the British Royal Engineers who commanded combat during the Second Boer War
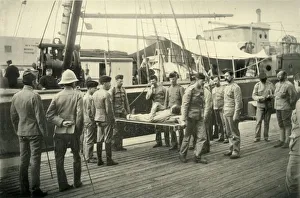
Arrival at Cape Town of Wounded from Natal, 1900. Creator: HoskingArrival at Cape Town of Wounded from Natal, 1900. Transports brought sick and wounded soldiers to hospitals in Cape Town because of inadequate hospital facilities in Natal
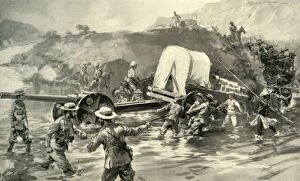
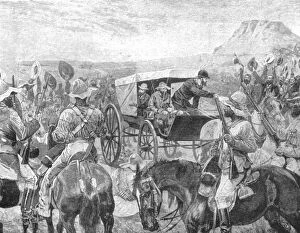
From Frere to Chieveley - Difficultues of Transport, 1900. Creator: Richard Caton Woodville IIFrom Frere to Chieveley - Difficultues of Transport, 1900. From " South Africa and the Transvaal War, Vol. II", by Louis Creswicke. [T. C. & E. C. Jack, Edinburgh, 1900]
The Siege of Ladysmith, Jan. 1900. View from Bulwana Hill, 1900. Creator: George LynchThe Siege of Ladysmith, Jan. 1900. View from Bulwana Hill, 1900. The Siege of Ladysmith during the Second Boer War, took place between 2 November 1899 and 28 February 1900 at Ladysmith, Natal
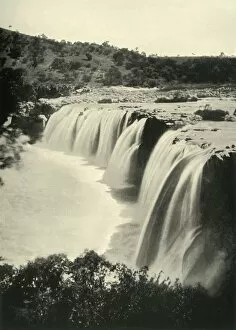
Falls on the Tugela River, 1900. Creator: WilsonFalls on the Tugela River, 1900. The Tugela River in Northern Natal, South Africa - a feature in strategy during the Second Boer War. From " South Africa and the Transvaal War, Vol
Fix Bayonets! - Repelling an Attack from the Trenches around Ladysmith, 1900. CreatorFix Bayonets! - Repelling an Attack from the Trenches around Ladysmith, 1900. From " South Africa and the Transvaal War, Vol. II", by Louis Creswicke. [T. C. & E. C. Jack, Edinburgh, 1900]
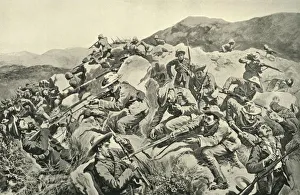
The Scene on Spion Kop - Major Thorneycrofts Desperate Situation, 1900. Creator: Frank CraigThe Scene on Spion Kop - Major Thorneycrofts Desperate Situation, 1900. British forces captured what they thought was the summit of Spion Kop
Colonel Pilchers Attack on Sunnyside Kopje, 1900. Creator: HC Seppings WrightColonel Pilchers Attack on Sunnyside Kopje-Canadian and Australian Contingents Receive Their " Baptism of Fire". 1900
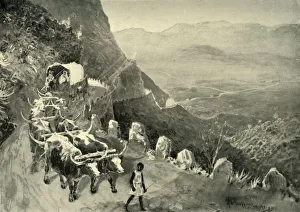
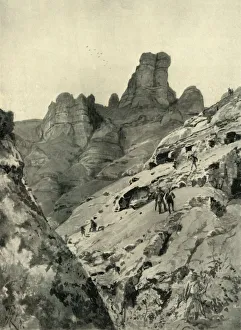
The Outbreak of War - The Drakenberg Mountains Where The Boers Were Laagered, 1900. From " South Africa and the Transvaal War, Vol. II", by Louis Creswicke. [T. C. & E. C
Going Out to the Attack on Spion Kop on January 24, 1900. Creator: Richard Caton Woodville IIGoing Out to the Attack on Spion Kop on January 24, 1900. The Battle of Spion Kop was fought on the hilltop of Spioenkop in Natal, South Africa from 23-24 January 1900
Royal Field Artillery (Action Front), 1900. Creator: Gregory & CoRoyal Field Artillery (Action Front), 1900. From " South Africa and the Transvaal War, Vol. III", by Louis Creswicke. [T. C. & E. C. Jack, Edinburgh, 1900]
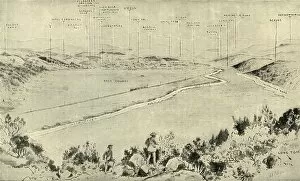
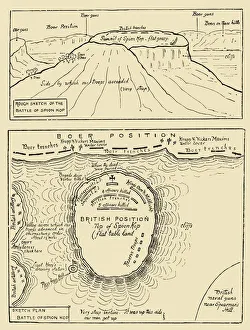
Sketch and Plan of the Battle of Spion Kop, 1900. Creator: UnknownSketch and Plan of the Battle of Spion Kop, 1900. The Battle of Spion Kop was fought on the hilltop of Spioenkop in Natal in South Africa from 23-24 January 1900
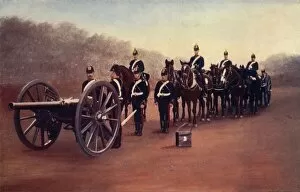
Types of Arms - 15-Pounder Field-Gun, 1900. Creator: CribbTypes of Arms - 15-Pounder Field-Gun, 1900. From " South Africa and the Transvaal War, Vol. II", by Louis Creswicke. [T. C. & E. C. Jack, Edinburgh, 1900]
Plan of battle of Elandslaagte, 1900. Creator: UnknownPlan of battle of Elandslaagte, 1900. From " South Africa and the Transvaal War, Vol. II", by Louis Creswicke. [T. C. & E. C. Jack, Edinburgh, 1900]
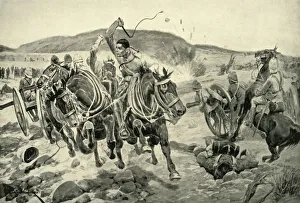
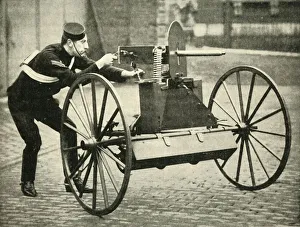
Types of Arms - Lord Dundonalds Galloping Gun-Carriage with Maxim, 1900. CreatorTypes of Arms - Lord Dundonalds Galloping Gun-Carriage with Maxim, 1900. Douglas Cochrane, 12th Earl of Dundonald served in the Second Boer War
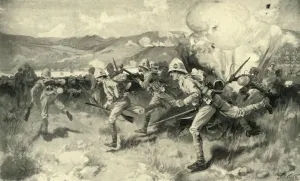
The Battle of Belmont, 23rd November 1899 - Bayonet Attack by the Scots and Grenadier Guards, 1900. From " South Africa and the Transvaal War, Vol. II", by Louis Creswicke. [T. C. & E. C
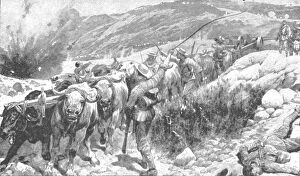
Taking the 4. 7 Naval Gun Across The Tugela, 1900. Creator: Joseph FinnemoreTaking the 4.7 Naval Gun Across The Tugela, 1900. The British crossed the Tugela River in Natal, South Africa with field artillery during the Second Boer War
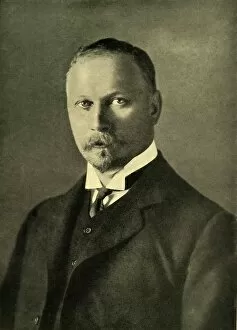
Lieut. General The Hon. J. C. Smuts, c1916, (c1920). Creator: Elliott & FryLieut. General The Hon. J. C. Smuts, c1916, (c1920). Portrait of Jan Christiaan Smuts (1870-1950), South African and British Commonwealth statesman
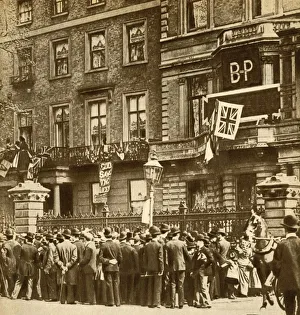
Mafeking Relieved, 1900, (1933). Creator: UnknownMafeking Relieved, 1900, (1933). Patriotic crowds celebrate outside the London home of British colonel Robert Baden-Powell after his part in the relief of the British-held town in South Africa
Boer and Briton Nursed Together, 1900, (1933). Creator: Horace Walter NichollsBoer and Briton Nursed Together, 1900, (1933). Red Cross nurses treating wounded of both sides during the Boer War in South Africa
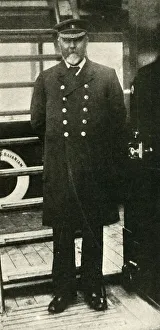
Captain MacNicol, of the Bavarian. 1900. Creator: UnknownCaptain MacNicol, of the " Bavarian.", 1900. MacNicol was the captain of the Allan liner Bavarian, launched in 1899
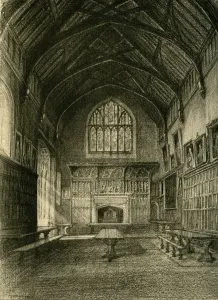
Interior of the Hall, 1911. Creator: UnknownInterior of the Hall, 1911. School Hall was built as a memorial to Etonians killed in the Boer War in 1906-08. From " A History of Eton College (1440-1910)", by Sir H
Colonial Troops in South Africa, 1899-1901: Australian Bushmen on the March, (1901). About 20, 000 Australians served and about 1, 000 were killed in the Second Boer War (October 1899-May 1902)
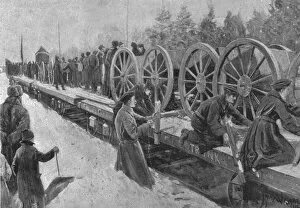
Colonial Troops for South Africa, 1900: Canadian Artillery entraining at Ottawa, (1901). Soldiers climbing onto flat-bed railway wagons carrying heavy artillery at Ottawa in Canada
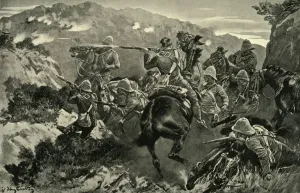
The Transvaal War, 1899-1901: A Sharp Engagement, (1901). Creator: UnknownThe Transvaal War, 1899-1901: A Sharp Engagement, (1901). Episode from the Second Boer War (October 1899-May 1902), fought between the the British Empire and two Boer states
The Transvaal War, 1881: President Brand Making the Declaration of Peace at Laings Nek, (1901)The Transvaal War, 1881: President Brand Making the Declaration of Peace at Laings Nek, March 24, (1901). Episode during the First Boer War: Johannes Brand (1823-1888)
The Transvaal War, 1899-1901: The Bluejackets Saving a Gun, (1901). Creator: UnknownThe Transvaal War, 1899-1901: The Bluejackets Saving a Gun, (1901). Episode during the First Boer War: British sailors pulling artillery with oxen
South African War Memorial, Plymouth, Devon, c1910. Creator: UnknownSouth African War Memorial, Plymouth, Devon, c1910. Obelisk made by Emil Fuchs and unveiled in 1903 in memory of Christian Victor Prince of Schleswig-Holstein and the fallen of the Gloucestershire
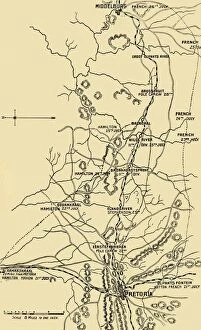
Map Illustrating the Eastward Move from Eerstefabrieken to Middelburg, 1901. Creator: UnknownMap Illustrating the Eastward Move from Eerstefabrieken to Middelburg, 1901. The Second Boer War (1899-1902) was fought between the British Empire and two Boer states